StoneGnome

Crochet Love · Crochet & Tunisian Crochet · Studying, Developing, and Teaching Crochet Techniques

  • Home/Blog
  • Crochet
    • Basic Skills
    • Beyond the Basics
    • Advanced Crochet
    • Stitches and Stitch Patterns
  • Tunisian Crochet
    • Basic Tunisian Skills
    • Beyond the Basics
    • Advanced Tunisian Skills
    • Stitches and Stitch Patterns
  • Tutorials n Guides
    • Guides
    • Step by Step Tutorials
    • Stitches and Stitch Patterns
  • Patterns
    • Pattern Posts
    • StoneGnome Shop ♥
    • Visit Ravelry
    • Visit LoveCrafts
  • Themes
    • Slip Stitches (ss)
    • Felting
    • Hats
    • Ribbing
    • Waistcoat stitch Love
    • Top Stitch
    • Amigurumi
    • Small Hearts
    • Ornaments
    • Seasonal Themes n more
  • About
    • Contact Me
    • Copyright and Selling
    • Personal Data & Privacy

A slim and light scarf is always useful — whether in spring or fall, on chilly summer nights, or indoors during the cold winter months.

Slim Tunisian Breeze Scarf

This scarf is also the PREMIERE of the unique Tunisian Breeze Stitch — a stitch I absolutely love for its softness, texture, and drape! 

It’s flexible lengthwise and, despite its long, ribbed texture, feels wonderfully light and delicate — the perfect way to show off this beautiful new stitch.

The Slim Tunisian Breeze Scarf pattern

This slim scarf pattern has actually been available for a while now, but between family and work, I couldn't find time to share it properly. Now, I finally have a quiet moment to write about it here.

The Slim Tunisian Breeze Scarf Pattern includes:

  • Yarn and stitch guides
  • Helpful photos and clear written instructions (3 pages)
  • A cheat sheet and a chart for easy reference

Slim Tunisian Breeze Scarf

Find the pattern on your preferred platform:
  • Ravelry
  • LoveCrafts
  • StoneGnome Shop
Or click the button to buy it now
Buy Now

The Tunisian Breeze Stitch

The Tunisian Breeze Stitch is a Tunisian crochet stitch pattern, I designed and named. I wanted something new - easy to work, and with open stitches and as few 'knots' as possible.

The stitch is very easy to work with, curl-free, and reversible. Once you get the stitch and find a rhythm, it works up quickly — pure crochet relaxation.


Ribbed effect on Tunisian crochet scarf

But you don’t have to take just my word for it. Testers of the Slim Tunisian Breeze Scarf had lovely things to say about the stitch too. Here's a glimpse of their feedback:
"Easy and fun to work up."
"Great stretchiness."
"Very stretchy!"
"Once you get the flow, it’s very easy and goes really fast."
"An intriguing way to work Tunisian crochet."
"No curl!"

Yarn Matters

It’s important to know that cotton - and similar stiff yarns - will not work well with this stitch, as cotton has no stretch.

The stitch pattern requires a soft, drapey yarn with some stretch-and-rebound when you pull it. The best choice is a yarn based on animal fibers like wool yarn and Alpaca blends. They really make the stitch pattern pop, adding depth and softness.

Acrylic can be used — just be aware that the texture will be less defined. However, a soft, stretchy acrylic will still make it lovely in its own way.

Slim Tunisian crochet scarf


Yarn Thickness

As this is a slim, lightweight scarf, it’s designed for relatively thin yarn.

Choose something with at least 210m/50g (or 230 yds per 1.76 oz) — or even finer. This falls into the fingering or sport weight range (US) or 4-ply/Sport in UK terminology, but toward the lighter end.

Hook

You do not need a special Tunisian hook for this — a normal, straight crochet hook without a handle is perfect. You can wrap a rubber band around the far end to improve grip and prevent loops from falling off.

Make your ow handle on the crochet hook

Read more: How to Hold Your Hook and Avoid Pain from Crochet
Read more: You Don't Need a Tunisian Crochet Hook

Hook & Swatch

Grab a 4–5mm hook and make a few small swatches (instructions are in the pattern). Then select the hook size that works best for your yarn.

Yarn Usage and Blocking & Stretching

With a yarn as described above and a 4-5mm hook, you’ll need less than 400m (440 yds) of yarn.

The stitch is extremely stretchy — a scarf measuring 140 cm (55 in) can easily stretch to 2 m (79 in) after washing and blocking. And yes, you should wash and block it! It really brings out the ribbing and adds impressive length to the finished scarf.

EXCEPT if you use 100% acrylic. Acrylic does not stretch much with blocking. In this case, plan to use about 30% more yarn and crochet to the full final length you want.

A little Encouragement

Treat yourself to the yarn the scarf deserves and give the Tunisian Breeze stitch a try. Enjoy making a truly one-of-a-kind scarf - soft, stretchy, and a joy to wear.

Slim Tunisian Breeze Scarf

Find the pattern on your preferred platform:
  • Ravelry
  • LoveCrafts
  • StoneGnome Shop
Or click the button to buy it now
Buy Now

Share
Pin
No comments
Waistcoat stitches in the round are fantastic for colorwork. They stack neatly, create a smooth, uniform fabric, and fill up space beautifully.

Crochet holder graph

If you’d like to try it, I’ve put together a small chart along with a few helpful tips.

Waistcoat stitches worked in the round are great for projects like pillows, bags, cowls, beanies, and more.

For my sample, I added 8 stitches to a round, and then the colorwork happened to fit an old glass. So, now the glass can be upgraded into a fancy crochet hook holder. - And yes, the glass is very happy with its new look.

The Heart Chart

I created the heart chart using StitchFiddle. I've shared it, so you can view or copy the chart for easy editing. FYI. StitchFiddle offers a handy progress tracker to help you keep your lines straight. 

If you prefer a paper version, click and print this image.

Hearts Crochet Chart

Never tried a Crochet Chart before?

If you're new to reading crochet charts, don't despair, it is easy to learn the basics: Each rectangle in the chart represents one stitch. Since this pattern is worked in the round, keep working in the same direction and do not turn your work. Read every round from right to left (if you are left-handed from left to right) and keep following the chart in the same direction as you crochet.

waistcoat stitch color graph

Just to let you know how easy it is, here is a written version of the beginning - BUT, please read additional notes further below before you do anything but a swatch:

Foundation. Chain 33 or more (I made 41).
  1. Work 1 single crochet stitch into each chain. (I prefer turning the chain over to insert my hook into the back bumps.). This is line 1 on the chart.

  2. Do not turn - instead, join into a ring by making a waistcoat stitch in the first stitch of your first line. Continue working in the round. As you follow the chart, work each stitch in the color shown for that rectangle.

  3. Continue working in the round and remember to change color right before every colored rectangle - see color change tip at the bottom of the page.
Repeat line 3.
❤️ · ❤️ · ❤️

Tips n Tricks

To get the best out of the waistcoat stitch colorwork, these additional notes can be helpful.

Keep the Waistcoat Stitches Straight

Waistcoat stitches don’t have to lean a lot! For a cleaner look make waistcoat stitches the right way. Insert your hook right before the vertical bar at the back of the stitch. (If you’re right-handed, this means inserting the hook on the right side of the bar.) This utilizes softer stitches and fabric and the stitches will lean a lot less.
Read more: Waistcoat stitch patterns in the round

Tension & Sizing

In case size is important to you.

  • The chart is designed for a gauge of 20 stitches × 28 rows per 10×10 cm (4″×4″).
  • I used a 4mm hook (US: G6) and Scheepjes Organicon, a very soft cotton yarn.
  • The final size of my work will be around 10cm (4") wide and 8 cm (3.1") tall. - Remember I added 8 sts to the chart for a full round.

I crocheted quite tight, so you can likely achieve the same gauge with maybe a 3mm hook (US:~D3) and a looser tension.

The hearts should still look great even if your gauge isn’t exact, but if size matters, be sure to make a swatch first.

Tapestry or Not?

Decide whether you want to:
  • Carry and crochet over the unused yarn throughout as for tapestry crochet
  • or let the unused strands float on the back. If you want to keep them under control, either twist the strands or just crochet over the unused yarn at every 4-6 stitch
Note. In tapestry crochet using waistcoat stitches, it is easy to accidentally catch the carried yarn when pulling up a loop. Also, be aware that tapestry crochet makes the fabric slightly taller, as each row takes up more space.

Color Changes

Make smooth color transitions by changing color at the last yarn-over of the previous stitch - except when creating a single, isolated 'V' in the design. In that case, simply pull up the alternate color once, then continue with the main color.


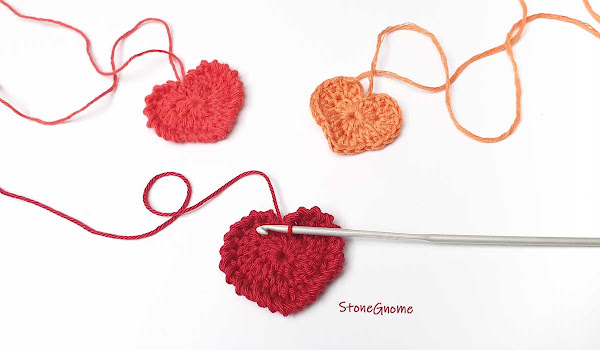
One stitch crochet heart

Happy crocheting! ❤️

Share
Pin
No comments
The twisted single crochet stitch adds charm to your project without too much fuss. Perfect for a simple border to frame your crochet work.

Make a twisted single crochet stitch for a border

Also, we’ve all had an edgy border, that could use a little LTC. The Twisted Single Crochet Stitch will help you do that. It is simple and easy to do. 

The twisted single crochet stitch is an excellent alternative to the crab stitch or the reverse single crochet stitch.

Note for British Crocheters - The term single crochet (SC) in US patterns corresponds to the double crochet (DC) in British terminology.

The Twisted Single Crochet Stitch - Instructions

  1. Insert your hook into the next stitch and pull up a loop.

  2. Pro tip: Expand the stitch a little - about twice as tall as usual. This makes the twist stand out and keeps the border softer and easier to work with.

    Pull up a tall loop


  3. Next, gently turn your hook towards yourself and all the way around. Counter-clockwise if you are right-handed (clockwise if you’re left-handed). This twists the loops on the hook. 

    Turn or twist the hook around

    Twist the single crochet stitch


  4. Finish the stitch with a yarn-over and pull through all loops.

    Finish the crochet stitch as usual


That’s it. The twisted single crochet stitch is simple, yet so effective! If you’d rather follow along with a video, you can check it out here.


Hearts to Love

Looking for a heart pattern to pair with the twisted single crochet stitch? Try the World Heart Day crochet pattern!.

World Day Heart Crochet Pattern

For more heartwarming designs, explore the other heart patterns here at stonegnome.com. 

Share
Pin
No comments
It’s cold and dark outside. So, have a happy hour with tea, a blanket, and a new little crochet project.
Crocheted Christmas Bauble
I've worked on different Christmas bauble ornaments, or Xmas balls the last few years. The first pattern is available below. Yeah!

Skills

The bauble is an intermediate/advanced project. If you are familiar with waistcoat stitches and slip stitches, the Christmas ball pattern is likely trouble-free and you can go straight to the yarn-hook suggestions and the pattern notes.

If the stitches - or this way of using them - are fairly new to you, a little extra effort might be required at first. I promise you, getting to know the stitches better is very well worth it.

Want more details about this way of working? Read: Tessa's Triangles - Hexagon Pattern

You should feel comfortable making uniform stitches of all kinds and it is also good to know how to adjust the tension of your work. - If not, read this one: How to Change and Control Your Tension

A Note about your Hook

A perfect hook for waistcoat stitches has a head that is slightly smaller than the neck and is pointy or has a lip/nose that makes it easy to insert the hook between the legs of the previous stitch.

Remember. We should always use the neck of the hook to determine the size of our stitches - and avoid tightening them after the loop leaves the hook. With waistcoat stitches, it is even more important or it will be difficult to make the following round.

Read about wellformed waistcoat stitches here: Waistcoat Stitch and Stitch Patterns in Rounds.

Yarn-Hook & Size

The bauble should be rather small to keep it light. A Catona-yarn-bauble like mine will be around 5cm (2") wide/tall.

I used:
  • Scheepjes Catona (Ravelry) 125m/50gr (138 yds/1.76oz)
  • hook size 4mm for the main parts and 3mm for the final round (US G6 and D3, UK 8 and 11).
However, any cotton yarn doable for amigurumi should work with this pattern. It could be cotton yarn with yardage 170m/50gr (186 yds/1.76oz) and hook size 3-3.5mm (US D3-E4, UK 10-9). For the final round use a slightly smaller hook for a nicer closing.

Crochet Christmas Balls

The Striped Bauble Pattern

The bauble is worked in rounds in a continuous spiral. (No joining with a slip stitch after each round).
Make not-tight stitches to make it easy to work with. Be thorough with the size of your chains. Adjust accordingly if needed, like when you change color.

Use a stitch marker or a long piece of yarn to mark the beginning of a round.

Use 3-4 stitch markers or tiny stitch holders for the final round.

Special Stitches

Slip stitch BLO decrease (slst-blo-dec). Hook into back loops only (blo). Hook into the next two stitches in reverse order. Yarn-over and pull through all loops. For more info and a video, see Slip Stitch Tutorials - Part III.

Unfinished-ws. Insert the hook between the legs of a stitch, yarn-over and pull up a loop, yarn over, and pull through one loop only. Keep the extra loop on the hook.

Waistcoat stitch decreases (cap version only). Insert the hook between the legs of the next stitch, yarn-over and pull up a loop, do the same for the next stitch so you have 3 loops on the hook, yarn-over and pull through all loops on the hook.

Abbreviations

ch = chain
sc = single crochet stitch
ws = waistcoat stitch
ws-c = Ws with a color change (see below)
slst-blo = slip stitch in the Back Loop Only (blo)
slst-blo-c = slip stitch BLO with a color change
slst-blo-dec = slip stitch decrease - in the back loop only
* * = Repeat instructions within * * all the way round
( ) = Repeat instructions within the parentheses as many times as instructed.
[ ] = number of stitches in the round

Color changes are marked ‘-c’. Change color while pulling up the last loop of a stitch, so the new color is ready for the next stitch. For slip stitches, pick up the new color immediately.

Instructions

Foundation
With red yarn. Make 6 loose sc in a Magic Ring. Pull the Magic Ring loosely together. [6]

1st Half of the Red Ball
  1. *1 ws in the first sc,1 ws-c in the same/current sc,
    ch-c 1 (change color to red immediately). *
    Repeat from * to * all the way. [18]

  2. Keep changing color so all ws appear red and all slst appear white.
    * With red. 1 ws in the ws,
    1 ws-c in the next stitch.
    With white; 1 slst-blo in the chain,
    1 slst-blo-c in the ws *.
    Repeat all the way. Start the repeats in the CURRENT ws. [24]

  3. This round you will have 3 white slst between the ws.
    * 1 ws in the current stitch,
    1 ws-c in the next stitch,
    1 slst-blo in each slst,
    1 slst-blo-c in the ws * [30]

  4. Repeat round 3. This round you will have 4 white slst. [36]

  5. Repeat round 3. This round you will have 5 white slst. [42]
Tighten the Magic Ring and weave in the yarn end from the beginning of the work. - Or - if you dare try if it will work for you, just tuck the loose end inside the bauble with or without a knot. - I mostly don't make a knot, mine are fine as long as they are only used for decoration purpose.

2nd Half of the Red Ball

  1. Begin this round in the ‘current ws’ and make the repeats from the ‘next ws’.
    * 1 ws in the ws,
    1 ws-c in the next ws,
    1 slst-blo in the next 4 slst,
    1 slst-blo-c in the last slst * [42]

  2. Repeat the previous round. [42]
Prepare to fill the bauble. Depending on your tension, yarn, and more, the white part might arch inward. Use it if you like, or fill the bauble firmly in the end, if you want a very round ball.

  1. * 1 ws in the ws,
    1 ws-c in the next ws,
    1 slst-blo-dec,
    1 slst-blo in the next 2 slst,
    1 slst-blo-c in the last slst * [36]

  2. * 1 ws in the ws,
    1 ws-c in the next ws,
    1 slst-blo-dec,
    1 slst-blo in the next slst,
    1 slst-blo-c in the last slst * [30]

  3. * 1 ws in the ws,
    1 ws-c in the next ws,
    1 slst-blo-dec,
    1 slst-blo-c * [24]

  4. * 1 ws in the ws,
    1 ws-c in the next ws,
    1 slst-blo-dec-c in the slst. * [18]

  5. * 1 ws in each ws * (Skip all slst). [12]
If you don't want a cap, head directly to the Final Round (No Cap). Otherwise, prepare for the cap. Use the colored yarn.

  1. Make waistcoat stitch decreases all the way [6]
slst and cut the colored yarn, Pull the yarn end through the loop. Secure ends. A little knot using the white and colored yarn should be fine. Tug the loose ends into the bauble. Gaps between the last round of stitches should be closed after the next round.

The Cap

Use a smaller hook and golden yarn. Attach the yarn by inserting the hook between the legs of the last waistcoat stitch (as if doing a new waistcoat stitch), yarn-over, and pull through. This doesn’t count as a stitch. To hide the loose end of the golden yarn, crochet over it for the next rounds.

  1. Make 2 rounds of waistcoat stitches.

  2. Slip stitch into the next stitch, cut a long yarn end, and pull through the last loop.
    Tighten the last slst.
Create a loop for hanging the ornament
Attach a needle to the yarn end. Insert the needle into the next stitch and out in the middle of the cap.

While leaving most of the golden yarn to form a large loop, bring the needle back into the cap's center, and out at the bottom of the cap, then reinserting it right next to the initial point.
Tie a knot using the large loop and the short loose yarn end. Tuck the knot and the yarn end into the cap to hide it.

Change to a hook 1 size smaller.

Make 1 ws in the first stitch and unfinished-ws the rest of the way. Every time you have 4 loops (max) on the hook, move 3 loops to a stitch marker /stitch holder (or just a piece of string). The loop you made last, keep that on the hook.

Last round of the Christmas Ball

Cut a long yarn end. Pull the yarn end through all the loops on the hook and then all the loops on the stitch markers. Use a needle or a hook.

Insert a needle

Fill the bauble - firmly for a round ball.
Tighten the yarn end and use a needle to secure it by going around in the last loops once more.

Closing the Christmas Ball

Insert the needle into the ball and let it emerge from the middle of the 'star'.

Striped Christmas Bauble Crochet Pattern

Please let me know below, if you chose this cap-less solution. - Otherwise, I might eventually remove this part :)

You are all done!

Shape the Christmas bauble by hand if needed and have a lovely crochet Christmas!

...Psst!

Waistcoat stitches are not used much with traditional patterns but are very fun to work with.
If you liked this, try other projects using waistcoat and slip stitches. You find them under the theme Waistcoat Stitch Love.
Originally published in 2022, last updated in 2024.
Share
Pin
No comments
Crochet with 3 strands of yarn
Working with 3 strands at once is faster and creates a softer, more unique texture compared to a single bulky yarn - and you might save yarn too. 

Crochet with 3 strands of yarn

Here, you'll find helpful tips on yarn usage, hook size, and more to make the process smoother!

Contrary to what you might think, crocheting with 3 strands doesn’t mean juggling 3 separate yarn balls. In fact, you can work with just one yarn ball, avoiding the mess altogether.

It’s not as tricky as it sounds, but it helps to be comfortable with your stitches to avoid confusion with the extra strands.

This post was originally published in March 2018 and was re-written as of October 2024.

Comparison. Regular vs 3-strand Yarn

Below, I’ve compared a regular wool yarn with a 3-strand wool yarn. Both have the same (total) weight per length, and the single crochet stitch rows were made with the same hook.

Spot the difference: Regular yarn vs 3-strand yarn

You’ll notice that the 3-strand yarn creates a slightly fluffier texture, taking up a bit more space than the regular yarn, even though their weight is the same.

Guide - Avoid the Mess

You can create 3 strands from a single skein or ball, preventing the tangles you’d get from using 3 separate balls. To do this, fold the yarn to triple it, as shown in the photo, and make the tripled yarn long - longer than what’s shown. I prefer making it at least 1 meter (40 inches) at a time.

Tripling the yarn

Make your slip knot as usual - or skip it* - and begin your project. 

*Read more: Avoid an Ugly Slip Knot

Running out of yarn

Eventually, you’ll run out of  3-stranded yarn. 

Pull up more strands

Simply pull on the end of your working yarn so it unfolds from the loop. Keep pulling until you have another long section of 3-stranded yarn to work with.

If you prefer a video demonstration, Ira Rot has a helpful video tutorial for this technique.

TIPS

A few tips to make your projects easier:

Hide Folding Points

In most cases, the points where you fold the yarn won’t show in the final project. However, if you’re working on a particularly delicate or detailed project, it is possible to hide them. You can either adjust the tension slightly, which will move the folding point. - Or - if the folded point lands on the front loop, simply remove the loop from your hook and turn it around so that the front loop becomes the back loop.

Read more: How to Change and Control Your Tension

Avoid Twisted Strands

Twisted strands will look different from not-twisted strands. It can affect the way they 'Fluff'. To keep the strands straight and airy, straighten them whenever you notice a twist. This extra attention can help maintain a special texture that adds extra to certain projects.
Hook Size

When comparing 3 strands to a same-weight regular yarn, a good rule of thumb is to use the same hook size. However, you might also benefit from using a hook 1-2 sizes larger (1-2 mm) since the fluffiness fills in the stitches differently and takes up more space making your project look more substantial without extra material.

Yarn Usage

A larger hook size, also means you may need a little less yarn for your project—not a bad bonus!

Again - it all depends on your project, though totally worth to try.

Perfect for...

3-stranded yarn is particularly well-suited for looser and more open stitch patterns or in exchange for a bulky yarn.
Read more: Comfy Crochet Footies

In open stitch patterns, you’ll really see the difference compared to using regular yarn. Some great stitch patterns to try include the Moss Stitch (and for my Danish readers: 'vævehækling') or the Tunisian Full Stitch. But don’t limit yourself—feel free to experiment with any stitch pattern!


Regular crochet moss stitch and Tunisian full stitch
Left: Moss Stitch in regular crochet. Right: Tunisian Full Stitch

I’ve worked on several projects using the 3-stranded crochet technique, and I absolutely love the texture and feel it creates. Check out how 3 strands look with the Tunisian Reverse Stitch.

I haven’t tried felting with this method yet, but it seems promising - definitely something to experiment with in the future!

Enjoy

The latest StoneGnome pattern where you can use the 3-stranded technique is the Comfy Crochet Footies.
Comfy Crochet Footies

Enjoy exploring this completely new world of textures and styles you can create with 3 strands of yarn.

Share
Pin
2 comments
The waistcoat stitch is a brilliant two-faced thing. But be aware of the waistcoat stitch trap!

The knit stitch aka waistcoat stitch

To unlock the waistcoat stitch's full potential, it helps to know its secrets and understand the nuances of the waistcoat stitch.

Most crocheters call the waistcoat stitch dense and sturdy while a few of us love it for its drapiness and flexibility.

And why is that? Because there are at least TWO versions of the waistcoat stitch! They differ slightly in appearance and significantly more in structure and flexibility.

You should know about both versions, so you can choose which one to use for a project.

How to Work the Waistcoat Stitch(es)

The Basics

The stitch is created by inserting the hook between the legs of the next stitch.

And then there is a trap: There is a vertical bar at the back of the stitch*. It matters whether the hook is inserted before or after this vertical bar. Zoom in at the topmost image to see it.

*Note. Actually, there are two bars at the back. The main culprit is a very straight up-and-down (vertical) bar, while the other is slanted and sits on the side of the stitch. The slanted strand is positioned so far to the side that I doubt anyone considers using it today when working a 'normal' waistcoat stitch. If we count it, we have 3 versions of the stitch. I will disregard this 3rd version for now.

The Most Common Waistcoat Stitch version

Most crocheters naturally insert the hook AFTER the vertical bar at the back. For right-handed crocheters, this is at the left side of the back bar. This is the natural motion when you have the hook in one hand and push it into a stitch.

The waistcoat stitch, natural move of the hook

This gives you one version of the stitch. The denser one.

Currently, the tight version of this stitch is commonly demonstrated in tutorials for the waistcoat stitch. It is likely that most crocheters are not aware of the alternative option or do not consider it to be important.

The 'Secret' Waistcoat Stitch version

Another option is to insert the hook BEFORE the bar at the back. For right-handed crocheters, this means inserting the hook at the right side of the back bar.

This gives you another version of the stitch. A stitch with more drape.

Stitch Hacks

There are different approaches of how to insert the hook when working the last stitch version.

Method #1
Some crocheters elegantly twist their hook, angling it more directly into the stitch or even slightly backward, in the opposite direction. Some of my testers prefer this.
Olga Poltava recently uploaded a YouTube video demonstrating this way of entering a stitch.

Method #2
I prefer to use the lip/nose of my hook to guide the hook into the right place. If necessary, I can use my fingertip at the back of my work to keep the back bar clear of the hook

If you want to try the nose/lip first, then take a look here:


Tips for the Drapey version
  • Find a hook that works for you AND the stitch. Avoid a bulb-headed hook. It's challenging to insert a very blunt crochet hook into the center of a stitch.

    I prefer a tapered hook. However, I did have testers that worked fine with Susan Bate's inline hooks.

  • Crochet lose and control your tension. Once you have pulled up a loop lift your hook a little above the work to crochet looser. 
Read more: How to Change and Control Your Tension

And be patient. If you've never tried this version before, it's like learning a new stitch, so, it may take some time to become accustomed to.

What is the difference?

There are differences between the two versions.

Leaning and Dense

The dense version of the stitch captures more yarn, resulting in a structure where the strands are more entangled and closely packed together within each stitch. This tight interlocking of strands reduces flexibility.

As the denser stitch version grabs the back bar, it is pulled slightly to the side, causing the waistcoat stitches to lean. 

The leaning and dense waistcoat stitch

On the wrong side of the work, the stitches create a neatly structured yet slightly skewed pattern, with the stitches shifting. Being an organized chaos or a coordinated mess.

Straight and with Drape

The less dense version of the waistcoat stitch doesn't grasp the back bar. This allows the strands within each stitch to move more freely, resulting in greater flexibility in the work. Additionally, capturing less yarn means the fabric becomes slightly lighter, creating a thinner texture. With a looser structure, the fabric also gains more drape.

The less-dense waistcoat stitch version hardly leans at all. 

The straight and softer waistcoat stitch

On the wrong side, the stitches also line up beautifully inside each other.


The origin of the Waistcoat Stitch(es)

It is often impossible to determine the exact origin of a stitch, though in this case, we have an approximate idea.

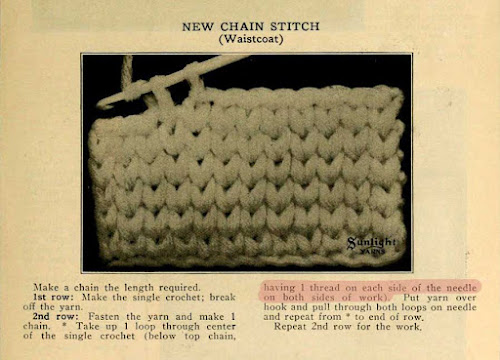
In 2013 Oombawka wrote about the waistcoat stitch and found a book from 1915 (thank you for sharing, Rhondda). The book refers to the waistcoat stitch as 'the new chain stitch', so it is possible the stitch was a recent development when the book was written. 

I recently dug into the same book and was quite surprised to find BOTH versions of the waistcoat stitches in there. 

Understanding the instructions might be a bit difficult. I have highlighted the important parts showing the differences in the working methods of the two stitches. The pictures also provide a clue to distinguish between them.

The waistcoat stitch aka the new chain stitch

It looks to me like the New Chain Stitch is the drapey version of the waistcoat stitch. It looks like the stitches should line up on both sides of the work.

The German waistcoat stitch

The second waistcoat stitch version in the book is a slanted version. At the time it was called the German Waistcoat stitch.

Just to be fair. It is unclear whether the hook is inserted to the left of just one back bar or possibly to the left of both back bars, including the slanted one.
Source: The Sunlight book of knitting and crocheting p. 25-26.

Which Waistcoat Stitch Version to use?

If a pattern does not specify a certain stitch version, it's likely that the designer is only familiar with the 'German' waistcoat stitch version and designed the pattern accordingly.

Then you can choose what to use:
  • Opting for a small hook and the dense 'German' version of the stitch results in a tight, dense, and thick fabric. Cotton yarn emphasizes this. Great for sturdy things like a hat or maybe amigurumi. You also get a nice spiral look, that can be very decorative.
  • Choosing a large hook and using soft, flexible yarn to work the drapey version of the stitch results in a fabric that looks and works more like stitch-stretchy knitted stockinette. Smooth and soft. This fabric is ideal for wearables, blankets, and even softer types of amigurumi, although using a smaller hook may be preferable to keep the filling in place.
I suggest you choose what works better for a specific project and for the result you want to achieve.

Enjoy your next waistcoat stitch project :)

Share
Pin
No comments

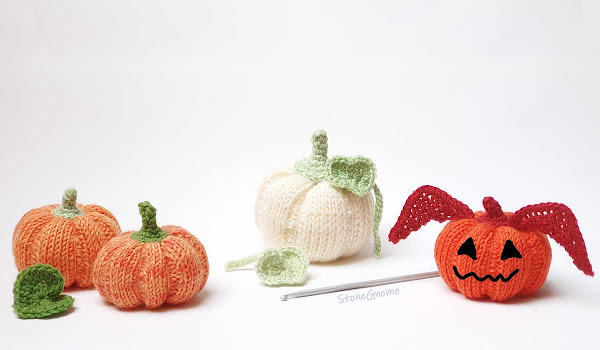
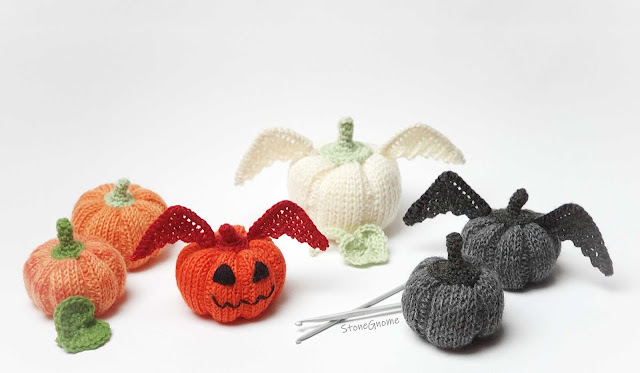
Crochet a Halloween Pumpkin. Make it happily orange, stylish, or scary.

Crochet Halloween Pumpkin

Add eyes and a mouth to your pumpkins for a playful touch, or let them keep a chic and neat look.

Updated September 2023.
The pattern has been tweaked and a few helpful images have been added.

The pattern has two pumpkin variations with stem and blossom. It also includes a leaf and wings. A small (optional) twist makes the wings mirrored.

The Halloween Pumpkin pattern includes a lot of helpful images - and is available in English and Danish.

Purchase the pattern now, right here: Buy Now

Or visit Ravelry, LoveCrochet, or the StoneGnome Shop.

Skills Needed

All the minor parts are made with regular crochet stitches. 

The body/head of the pumpkin is made with Tunisian crochet stitches. If you don't know Tunisian crochet, don't worry. You will only need to learn a couple of basic Tunisian crochet stitches to make this, and it can be made with a regular crochet hook (with no handle).

Halloween crochet pumpkins

Reverse Stitches

This is totally optional. But if you want to make the wings truly mirrored, a few unusual stitches are explained in the pattern.

I've borrowed the technique from Tunisian crochet where they are called 'reverse stitches'. However, it is different from the kind of reverse stitches we usually relate to, when we do regular crochet. 

See more in the pattern or check this out: Another kind of Reversed Stitches.

Happy Halloween!

Share
Pin
No comments
The waistcoat stitch is a lovely little thing and you can make beautiful yet easy and fast-worked stitch patterns with it. Let me show you.

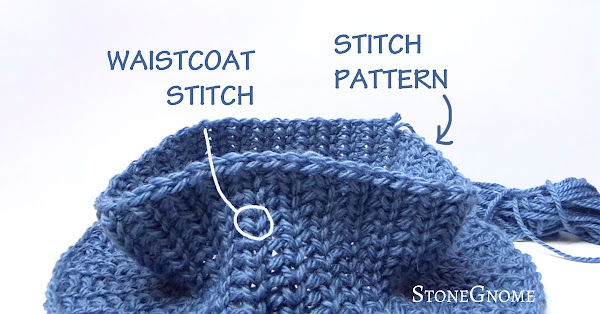
Waistcoat stitch and stitch pattern tutorial

Share
Pin
No comments
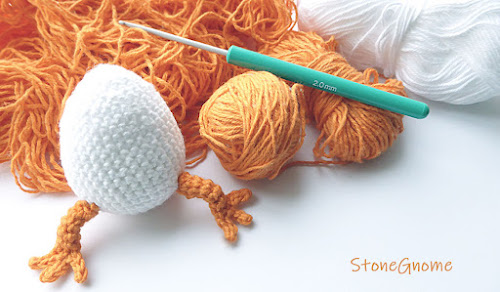
Bunny Egg usually hangs out around Easter enjoying the company of Junior Egg. 

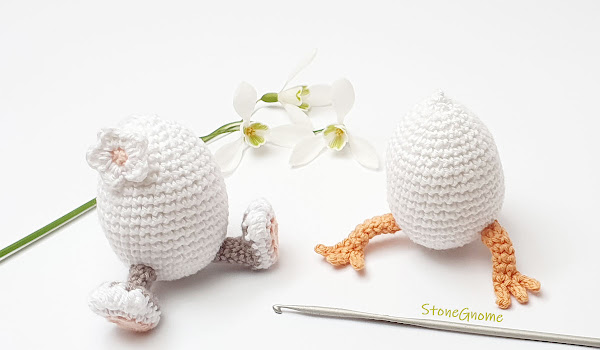
Crochet Easter Bunny Egg and Junior Egg

Hence, the pattern for Bunny Egg has been updated and now includes Junior Egg. The two of them love that ♥ 

The 2-in-1 pattern is available at Ravelry, LoveCrafts or you can purchase it in the StoneGnome Payhip store. It's available in English and Danish.

If you want to try Junior Egg for FREE, then you'll find Junior right here.

Updated. This post has been updated as of March 2023

Skill level

The pattern is written for crocheters that are familiar with amigurumi. Difficulty level is intermediate/advanced. There are a few special stitches like BLO and Puff stitches. They are slightly modified, but - of course - explained.

Junior is the easiest one to make, while you might need a little peace, glasses and good light when you make the legs for Bunny Egg.

Size and Yarn

The Easter Egg will be around 6.5cm tall (2.6") if you work with the recommended hook size 2-2.5mm (US 0-B1 or steel 4, UK 14-13).

Use regular cotton yarn for amigurumi.

It could be something like Scheepjes Cotton 8 or similar.
Colors could be:
  • 502 white
  • 710 grey
  • 649 soft coral (or 715 nude).
  • 639 Burned Orange.
Bunny Egg and Junior Egg


I tried Scheepjes Organicon (Ravelry link), which was soft and lovely to work with. Even a bit thick and fluffy in the right way. Totally recommend this for a luxury project and if the egg is for decoration purposes only.

However, if you plan to use the Easter Egg as a toy, the yarn might get a little worn out faster than other yarn. At least that is what I experienced when I used it for samples and had to frog it several times.

More versions

Margie helped test and proofread the original patterns. Check out her latest colorful Junior Eggs from 2023 or her very, very cute Bunny Egg on Instagram. 

Thank you Margie for being such a patient and positive tester and proofreader.

Enjoy the pattern and Easter!

Related blog post: Junior Egg
Share
Pin
No comments
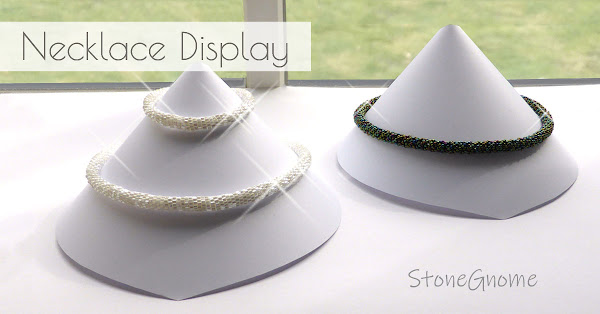
Make an angel display for a crocheted necklace or a beaded crochet necklace. The display can be used for selling items at a market, if you attend an exhibition, or maybe for a special gift. 
Necklace Display - for Beaded Crochet Necklaces
I made the display in 2017 for an exhibition I was attending with other textile and yarn freaks; weavers, filters, knitters, and crocheters. I wanted to present my crocheted necklaces in a nice way.

UPDATE: Due to requests, this writing and the templates below have been updated in January 2023.

First, I found a template (and tutorial) at Georgia P Designs. There are cones for bracelets, a cone for a necklace, and a flat-back necklace display stand.

However, one of my necklaces comes with a tight bracelet. I wanted the necklace and the bracelet to be on the same display, which required the bottom of the template to be rather wide compared to the top of the template. Otherwise, the distance between the two would be too big.

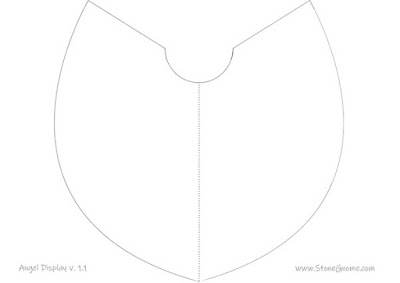
After playing around for a little while, I ended up with a display shaped like angel wings. 
The files are available from my google drive. You can get a full-size copy from the links.

  • Angel Display template - as JPG
  • Angel Display template - as PDF
Make the printed side the back of your cone. The print on the template files is rather pale, so it doesn't show through the paper.

If you can't print close to the edges, you can shrink it a bit (your printer dialog should help you with this) - OR you can ignore the missing print at the margins. It should be fairly easy to guess where to cut. Use the dotted line as a guide for the front tip.

Necklace Display - Angel Wings

Carefully fold it, so the back flaps overlap with about 1cm (0.4in), and glue the part that overlaps.

I've used heavy 190g A4 paper with a very smooth surface, so I sewed a couple of stitches on the back to make the necklaces and the bracelet stay in place. I've seen others cover the display with wallpaper or likewise and I'm guessing a rougher surface will prevent the necklaces from slipping.

The Exhibition

The keywords for the exhibition in 2017 were to show some of the many different things you can do with yarn and textiles. It used to be an annual recurring event in Gudhjem Museum (Denmark, Bornholm). The last years have been hard on exhibitions due to lockdowns and restrictions, but hopefully, there will be more yarn and textile exhibitions in the future. 

I enjoyed the beaded crochet work a lot, so I might also need the displays again one day.

Read more: Beaded Crochet Rope Necklace

Links to Display Ideas

Here are a couple of other display ideas and templates in case you need something special.
  • Georgia P. Designs templates and tutorial
  • A Plywood Jewelry Pyramid tutorial can be found at Collectivegen.com (former 'A Pair & Spare'), which also posted templates for a couple of Wooden Jewellery Holders in May 2022.
  • 3 other DIY Necklace displays are present at Tutorial De Artisana (eng: Craft Tutorial)
Share
Pin
No comments
Crochet your own decorated eggs. Use a basic egg and change colors as you wish for nicely decorated eggs.

crochet Easter eggs

If you use waistcoat stitches for your egg you get different options. Like small, heart-shaped dots ♥ 

Share
Pin
No comments

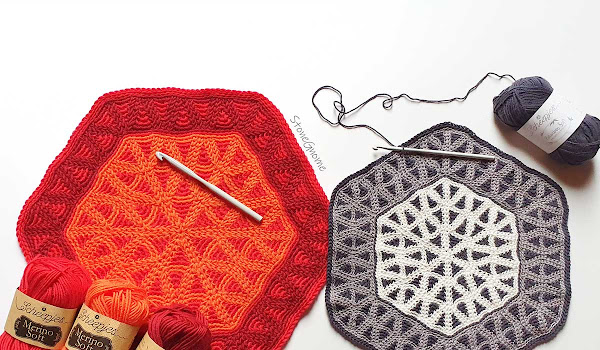
The innovative crochet pattern is great as a winter project. Tricky Triangles is a mandala presenting a new way to crochet in the round.

Tricky Triangles Mandala Crochet Pattern

The mandala will be soft and drapey and excellent for making a pillow or you can make it a decorative table topper. There are a lot of other possibilities for hexagons if you google it.

The Mandala

I'm not sure if the level of it is beyond basics or advanced. It might more be a matter of preferences and whether you can find a hook that works for you.

It's colorwork and it requires you to make somewhat uniform stitches. The main stitches are slip stitches and waistcoat stitches. If you are not sure whether these stitches suit you or not, try the FREE introduction pattern Tessa's Triangles first.

Read more: Slip Stitch Tutorials.
Read more: Waistcoat stitches and Stitch Patterns in Rounds

Tricky Triangles comes with a 30% introductory discount. The discount is only available on Payhip or Ravelry and runs out in 2 weeks (Nov. 18th Copenhagen time). Use the coupon code TRICK to get the discount.

The mandala pattern is available in English (US terms) and Danish. 

Get the pattern at Ravelry, at LoveCrafts, or right here via my new Payhip Store.

Tricky Triangles

Yarn, Hook sizes, and Final Sizes

In theory, you can use any three yarn balls and a relatively large hook. Preferably a hook with a relatively small head. For the best result, the yarn should be uniform and soft, with a smooth look.

The yarn I have used is very soft and likable, so I can certainly recommend it.


Peppermint and Licorice
Hook size 5mm (H-8). It gets around 30cm (11.8") wide.
Crochet Mandala. Peppermint and Licorice Scheepjes Organicon/Bamboo Soft.
Organicon - 220 Broken Almond
Bamboo Soft – 263 Smokey Diamond (dark)
Bamboo Soft – 264 Antique Silver (grey)
(Big) Red.
Hook size 8mm (L-11). The red is approximately 37cm (14.5") wide.
Crochet Mandala. (Big) RedScheepjes Merino Soft.
645 Van Eyck (orange)
621 Picasso (red)
623 Rothko (dark red)

Yarn Packages

Littlebugz.dk made yarn packages for both versions. It might be of most relevance if you live in Denmark, Sweden, and Norway - or close. She is good at adding discounts on yarn packages for my patterns.

Have a look at the yarn packages at Littlebugz.

FYI. A lot of the yarn I use is sponsored by Littlebugz.dk. Littlebugz then makes yarn packages for my patterns. And in case you wonder. Littlebugz doesn't sponsor my opinion or anything other than the yarn 😊

Thank You

Thank you to all that have helped me out. Janelle did a great job before it was even a pattern. She helped me with terms and the structure of the written pattern. Then Anita Reinehr came in early to do a superb tech edit. Unusual yes, but with a new thing, it felt important to do a tech edit before having the pattern tested. 

Finally, a lot of people did testing. Some just partly, some only on the early Tessa's Triangles. Thank you to all of you too; Pamela Tan, Robyn Kaltea, Ruth Lister, Jess Wells, and more.

Share
Pin
No comments
Older Posts

Newsletter

Don't miss the next tip or pattern
from StoneGnome.

Find StoneGnome at

  • Ravelry
  • LoveCrafts
  • Littlebugz

  • Facebook
  • YouTube
  • Pinterest
  • Instagram

Loop Legends

  • From Image to Crochet Chart
  • How to Find Your Gauge
  • Mini Neck Warmer
  • Guide: Splitting Yarn
  • You Don't Need a Tunisian Crochet Hook
  • Crochet (Sea)Grass and Succulents
  • Chain Mail Shirt
  • Minor Felting Mishaps

My favorite Links

  • StoneGnome Pattern Shop
  • StoneGnome at Ravelry
  • StoneGnome at LoveCrafts
  • Crochet Kim
  • Annie's Catalog
  • Designing Vashti
  • Stitch Fiddle
  • Stitchboard · Pattern Wizard
  • Free Vintage Crochet

Labels

Bornholm Split Crochet advanced amigurumi basic beads christmas crochet crochetChart easter edge felting filetcrochet freePattern guide hat miteredCorner ornament paidPattern pattern ribbing shoes slipStitch spiral stitchPattern topStitch tunisian tutorial

All Crocheticles

  • ▼  2025 (3)
    • ▼  June (1)
      • Slim Tunisian Breeze Scarf
    • ►  February (1)
    • ►  January (1)
  • ►  2024 (6)
    • ►  December (1)
    • ►  November (1)
    • ►  October (2)
    • ►  April (1)
    • ►  March (1)
  • ►  2023 (7)
    • ►  September (2)
    • ►  June (2)
    • ►  March (1)
    • ►  February (1)
    • ►  January (1)
  • ►  2022 (3)
    • ►  November (1)
    • ►  April (1)
    • ►  February (1)
  • ►  2021 (9)
    • ►  November (1)
    • ►  October (3)
    • ►  September (2)
    • ►  May (1)
    • ►  March (1)
    • ►  February (1)
  • ►  2020 (15)
    • ►  December (1)
    • ►  November (1)
    • ►  October (2)
    • ►  May (2)
    • ►  March (2)
    • ►  February (3)
    • ►  January (4)
  • ►  2019 (8)
    • ►  December (2)
    • ►  October (2)
    • ►  September (1)
    • ►  May (1)
    • ►  March (1)
    • ►  February (1)
  • ►  2018 (15)
    • ►  June (3)
    • ►  May (1)
    • ►  April (4)
    • ►  March (1)
    • ►  February (4)
    • ►  January (2)
  • ►  2017 (48)
    • ►  December (4)
    • ►  November (3)
    • ►  October (2)
    • ►  September (5)
    • ►  August (5)
    • ►  July (3)
    • ►  June (5)
    • ►  May (3)
    • ►  April (4)
    • ►  March (5)
    • ►  February (5)
    • ►  January (4)
  • ►  2016 (25)
    • ►  December (5)
    • ►  November (7)
    • ►  October (5)
    • ►  September (4)
    • ►  August (4)
FOLLOW STONEGNOME @INSTAGRAM

    Ⓒ StoneGnome · Created with · by BeautyTemplates