Waistcoat Stitch and Stitch Patterns in Rounds
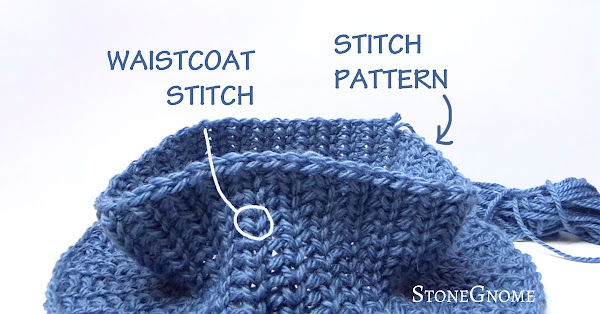
The waistcoat stitch is a lovely little thing and you can make beautiful yet easy and fast-worked stitch patterns with it.
Let me show you.
Did you know? The waistcoat stitch (ws) is also called the crocheted knit stitch (ks), the center single crochet stitch (csc), and the split single crochet stitch (ssc). With a lot of ways to abbreviate.
Related: All posts about waistcoat stitches here on www.stonegnome.com
Updated June 2023.
This post has been enhanced and new parts have been added for more details on the subject. The original post was published in January 2019.
This post has been enhanced and new parts have been added for more details on the subject. The original post was published in January 2019.
Why Waistcoat Stitches are SO Special
The way you make the waistcoat stitch prevents the stitches from closing up and becoming knotty. The way the stitches are interlocked in each other forces the stitches to stay open. Using a soft yarn and a large hook gives you a fantastic soft drape that is just as soft as a knitted item.
Furthermore, the waistcoat stitches can be lined up beautifully. Compare them to a regular work of single crochet stitches. You might notice that rows of single crochet stitches are slightly shifting? This is a thing you don't need to take into consideration, if you do waistcoat stitches in the round, like amigurumi, or wearables like neck warmers and infinity scarfs made in the round.
Waistcoat stitches can stack up right on top of each other.
Waistcoat stitches can stack up right on top of each other.
How to make the Waistcoat Stitch in Rounds
Working the stitch in rounds vs rows differs. Here, is what it looks like when you are working in rounds.
The stitch itself is easy. Basically, it is a single crochet stitch, where you insert the hook a little differently.
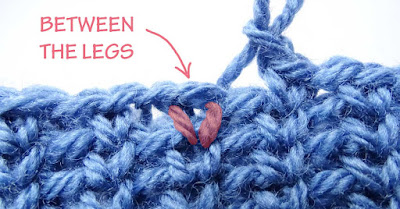
Normally you hook in under two loops. When doing the waistcoat stitch, you insert the hook between the legs of the stitch in the previous row.
Normally you hook in under two loops. When doing the waistcoat stitch, you insert the hook between the legs of the stitch in the previous row.
Make sure you insert the hook right before the bar/bars at the back of the previous stitch. If you are right-handed, insert the hook on the right side of the back bar(s).
Remember. We are still talking about working in rounds.
Different Ways - Different Results
Some crocheters will tell you to insert the hook BETWEEN the bars at the back (yes, there are actually two bars). If a designed pattern clearly states how the stitch should be done, then it might be wise to follow the instructions.
I'm not sure if there is an original way of doing it. If you insert the hook between the bars, you get a slightly more firm result, and your stitches will have a natural urge to lean/tilt. This might work well for Amigurumi.
I prefer a looser and friendlier fabric, and that the stitches don't look like they tilt. This can easier be achieved when the back bars are not enclosed in the stitch.
Tip #1. Use a BIG Hook with a Small Head
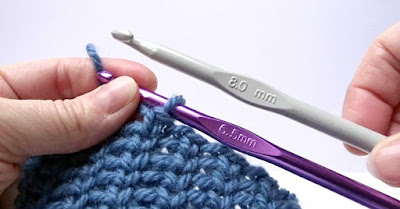
The stitch will be compact if you use the recommended hook size for a yarn. To keep a nice drape, you need a much larger hook, than usual. For the samples here the yarn asked for a 4.5-5mm hook, but I used a 6.5mm hook. An 8mm hook might have been even better for most of us. (In the US the yarn asks for size 7-8, but is exchanged with size 10.5. Size 11 might have been even better).
Also, If you can find it, I will recommend using a hook with a relatively small head. The neck of a hook should always be responsible for the size of a stitch, and the head should be easy to insert into a stitch.
Tip #2. Loosen Up and Use the Hook Lip
Crochet loose. This makes it easier to insert your hook at the center of a stitch.
If the tip of your crochet hook is very bulbous and doesn't easily slide in between the legs of a stitch, then use the lip/nose of your hook. Just be careful not to pull one of the front legs or your stitches will look uneven. (see the video below)
Video
The video here shows how to do the waistcoat stitch the way I suggest doing it. Don't miss the last part of the video, where you can see the back of a waistcoat stitch pattern, the way I recommend doing the stitch.
Simple Stitch Patterns in Rounds
The waistcoat stitch is very low, so it is excellent for stitch patterns, where you alternate with a chain. You don't get big gaps between the chain rows. Like the waistcoat stitches, the chains also support a fantastic soft drape.
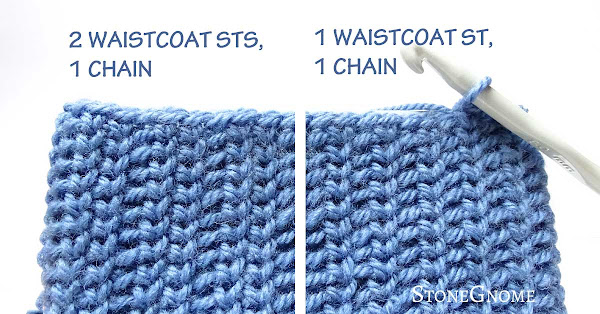
Two of my favorite basic waistcoat stitch patterns are below.
- 2x waistcoat sts, chain 1. Repeat all the way.
- 1 waistcoat st, chain 1. Repeat all the way.
Unlock more Secrets
When you are ready to delve deeper into the possibilities of the waistcoat stitches, continue exploring all the different patterns below.
Mini-patterns (free)
Tessas Triangles - Hexagon pattern - Introduction pattern for the Tricky Triangles Mandala
Patterns based on Waistcoat Stitches
Tricky Triangles Mandala- recommended!
StoneGnomes Infinity Scarf - The free CAL or the written pattern


0 comments
I’d love to hear your thoughts! ❤️
If I don’t reply to a question here, feel free to reach out via the contact page :)