StoneGnome

Crochet Love · Crochet & Tunisian Crochet · Studying, Developing, and Teaching Crochet Techniques

  • Home/Blog
  • Crochet
    • Basic Skills
    • Beyond the Basics
    • Advanced Crochet
    • Stitches and Stitch Patterns
  • Tunisian Crochet
    • Basic Tunisian Skills
    • Beyond the Basics
    • Advanced Tunisian Skills
    • Stitches and Stitch Patterns
  • Tutorials n Guides
    • Guides
    • Step by Step Tutorials
    • Stitches and Stitch Patterns
  • Patterns
    • Free Patterns
    • Paid Patterns
  • Themes
    • Slip Stitches (ss)
    • Felting
    • Hats
    • Ribbing
    • Split Crochet Love
    • Top Stitch
    • Amigurumi
    • Small Hearts
    • Ornaments
    • Seasonal Themes n more
  • About
    • Contact Me
    • Copyright and Selling
    • Personal Data, Cookies and Marketing

Most of us cannot crochet with both hands. Though sometimes it would be useful to be able to.

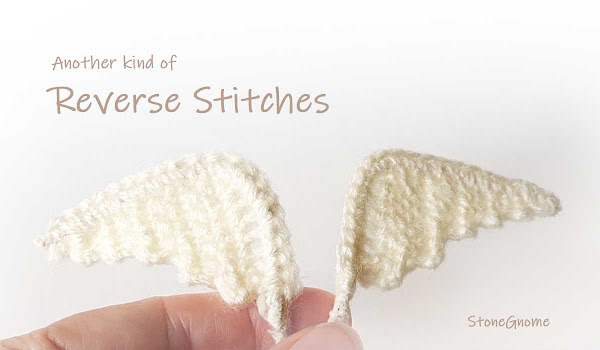
Another kind of reverse stitches

When I made wings for a pumpkin (yes, for a pumpkin, a Halloween pumpkin), I wanted the reverse side of the second wing to look like the front side. Including the small ridges. 

It would have been great if I could have worked the second wing with my left hand. Then it would truly be  'mirrored' versions of the same item.

There is an alternative. In Tunisian crochet, there is something called 'reverse stitches'. Reverse stitches in the world of regular crochet are usually related to stitches like the 'crab stitch', where you crochet in the opposite direction (right-handed work from left to right). 

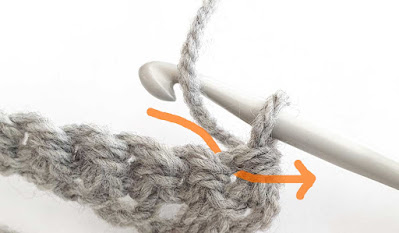
However, with Tunisian crochet, the reverse stitches are not made in a different direction but on the reverse side of the work. Inserting the hook behind the work.

This is really all there is to it and it can be done with regular crochet too. 

Regular crochet - reverse stitches

Video

If you prefer a video to see how it can be done, then I made one for you here.


Just like any other new Stitch

Try it. Practicing reverse stitches is just like learning any other new stitch. It might seem uncomfy in the beginning, but then it gets easier and easier until it feels like piece of cake.

:)
Share
Tweet
Pin
No comments

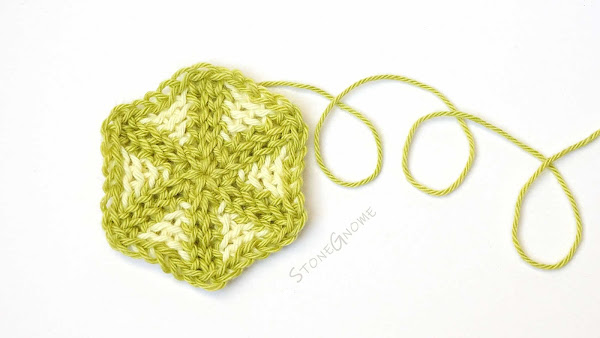
A cute little hexagon made with unusual stitches.

Tessa’s Triangles - Hexagon crochet pattern

Make one little hexagon and you have a coaster. Make more hexagons and you can make a bag and with a little patience maybe even a blanket.

Introducing New Techniques

Tessa’s Triangles hexagon pattern is an introductory pattern. Learning how to work these stitches is the key to more advanced patterns. Another pattern is coming up soon at StoneGnome.com. You might also get ideas for making some on your own after making the hexagon. 

Tessa’s Triangles is a free pattern and is available in English and Danish.

Get the Pattern

Get the pattern now in StoneGnome’s new Payhip store*, on LoveCrochet, or add it to your library at Ravelry.

*Payhip will ask for your email, but that is only to make sure you get access to the pattern.

Pattern update: The hook conversion in the written pattern should be hook size 5mm = US H-8, as stated in the video tutorial. 
If you are happy with using US I-9, then please keep using that.

Want the Newsletter? Find the orange button on this site and sign up for the newsletter.


Tricky Parts

There ARE tricky parts in Tessa’s Triangles. Finding the right spot to insert the hook, when making waistcoat stitches in a round is probably new to pretty much all crocheters. It took me a while to figure out too.

Round 1 is tricky. So much is going on at the same time. Work slowly and take your time. 

Tip. Omit the color change in your first sample and make chains instead of slip stitches, if it helps you. Then you can concentrate on the waistcoat stitches.

I have another workaround for the first round in mind, but it will not give you the nice star in the middle, but it can get you started. The workaround will be available soon.  

Follow me @Instagram. I might show these little workarounds there if it helps you.

Visual Learner?

To support the written pattern, a video is available. Some parts might be easier to do if you see how I do it.

Direct link to the video https://youtu.be/_uiaJC1xGgQ

Share

Share your hexagons. Tag me on instagram (with @stonegnomedesign) or facebook (with @stonegnome), so I can see how far you get. Feel free to also tag me, if you run into trouble. Then I’ll do my best to help you out. <3 

Have fun with this.

Tricky Triangles Teaser
Share
Tweet
Pin
No comments
Sry for being so quiet. Here is a brief update.

I'm preparing brand new patterns and stitch patterns for you…

Share
Tweet
Pin
No comments
Sometimes it is difficult to join or sew two pieces together and make it look good.

Tunisian Reverse Stitches - The Sides

If you have ever considered working with the Tunisian Reverse Stitch, you might want to read along here.

Share
Tweet
Pin
No comments
Most guides about crochet and tension talks about how tight you hold the yarn with your non-dominant hand. This is only half the story, though.

Tunisian Crochet - How to Change and Control your Tension

What you do with the right hand (dominant hand) and what you do with your hook, is also important.

Share
Tweet
Pin
No comments
What if you want to cast on for your Tunisian project and only have one hook?

Tunisian Crochet Cast On - Single Hook

Here is a way to do that. And this technique might be even easier than the two-hooks casting on.

Share
Tweet
Pin
2 comments
I have always admired, when knitters did a cast on and 1-2-3 got thousands of loops on their hooks... eh, needles.

Tunisian Crochet Cast On - Chainless

You can also cast on when doing Tunisian crochet - as in without a starting chain. And it is much faster than doing chains first.

Share
Tweet
Pin
4 comments
Fluffy and furry yarn tips
Fluffy yarn, fuzzy yarn, fur yarn or eyelash yarn. All of these long-fibered yarn types aren't always easy to crochet with. But, they look so fluffy and soft and kitten-like...

Fluffy and furry yarn tips

Here are a couple of tips for you, so you are prepared next time you find a fluffy or furry yarn.

Share
Tweet
Pin
No comments
In my last blog post, I showed you how to link stitches. I also have a suggestion of how to do a back-linked stitch, which is much less visible.

Back-linked crochet stitches - Tutorial

Furthermore it gives you a fantastic texture and drape. This is truly useful for scarves and other things you wear.

Back-Linked Stitches

When doing 'ordinary' linked stitches, you get a visible link at the front of the stitch. Sometimes you don't want that. In that case, I've work out a method, where you use a bump on the back of a stitch to link into.

Back-linked crochet stitches
Back linked stitches. Almost invisible at the front.
See the back side below.

Notice. You can link double crochet (dc) and taller stitches (US terms), though you can also link a dc to a half double crochet stitch (hdc), if the hdc is made first.

Tutorial

Like linked stitches, back-linked stitches are also made by replacing the normal yarn-over (YO) with a link. In back-linked stitches you insert the hook into a bump on the back of the last stitch. Look at the back of a chain stitch. There is a bump there, we will use.

Taller stitches usually start with 2 or more YO. Each of these YOs should be replaced with a insert-into-the-back-bump-yo-pull-up-loop.

Foundation. Make a row of 8 chains. Turn with 2 chains. Be careful NOT to tighten the last chain and the loop on the hook too much or you cannot insert the hook in the bump.

Note. The 2nd chain from the hook will be the 'footer' of this 2-chain turn stitch (for regular linked stitches the 3rd chain is the 'footer'.)

  1. Make the first back-linked stitch by turning your work, so you can see the back of your last chain. Find the first back bump close to the hook and insert the hook here. YO and pull up a loop.
Back-linked crochet stitches - img 1

  1. Skip one chain and insert the hook in the next stitch/chain as you would do with a normal dc. YO and pull up a loop.
Back-linked crochet stitches - img 2

  1. Finalize the dc as usual. *YO and pull through two loops.* Repeat this.
Back-linked crochet stitches - img 3

Back-linked crochet stitches - img 3b

  1. The back-linked stitch is done. If you count the 2-chain-stitch, there are now 2 stitches in the row.

Back-linked crochet stitches - img 4


All the following stitches look alike. Turn your work a little, so you can see and find the back bump closest to the hook.

  1. Insert the hook in the back bump. YO and pull up a loop.
Back-linked crochet stitches - img 5

  1. Insert the hook it the top of the previous row or chain (as usual). YO and pull up a loop.
Back-linked crochet stitches - img 6

  1. Finalize your stitch as usual. *YO, pull through two loops* until there is only one loop left on the hook.
Back-linked crochet stitches - img 7

Back-linked crochet stitches - img 7b

Turning

Turn with 2 chains. Do not tighten the last chain too much.The first linked stitch can be difficult, if you tighten your chains too much.

  1. Find the back bump of your last chain and insert the hook here. YO and pull up a loop.
Back-linked crochet stitches - turning 1

  1. Insert your hook into the next stitch of the previous row (as usual). YO and pull up a loop.
Back-linked crochet stitches - turning 2


Finalize the stitch as usual with *YO and pull through two loops* twice. Repeat 5)-7) all across for a full row of linked stitches.

Two rows of back-linked stitches
Two rows of back-linked stitches.

Video

I know some of you like a video. So I hope this is useful for you. Remember to click like, if you like it and I would also love if you subscribe to more on youtube.


The Geeky Note

When I had worked with linked stitches for a short while, something hit me. If you have tried linked stitches with taller stitches and if you know Tunisian crochet by heart, maybe you have seen it too. To me, linked stitches are similar to short rows of Tunisian crochet stitches.

Ordinary linked stitches are Tunisian simple stitches and the back-linked version is similar to the Tunisian top stitch - which btw, is one of my favorite Tunisian stitches due to its drape and how it can be used for a flexible rib.

What Name to Use?

So, maybe we could just call linked stitches for short rows of Tunisian simple stitch and the back-linked stitches for short rows of Tunisian top stitch?

Well... my problem is that I need to add a disclaimer here. I believe some has argued that linked stitches are NOT Tunisian stitches. I don't see any difference, but now I'm not sure, if we should call them one thing or another - or if the purpose and way of thinking of them can justify two different names.

Funny world, right?
Share
Tweet
Pin
No comments
I'll show you how to link crochet stitches and eliminate the slit between them.

Tutorial: How to link crochet stitches

It is very useful, if you want to use a tall stitch for an amigurumi figure or just want another stitch in your stitch collection.

Share
Tweet
Pin
No comments
The Picky Pillow Pattern now includes TWO pillows in the exquisite Twisted Stitch pattern.

Picky Pillows - now there are TWO of them

If you bought the pattern already, remember to get the updated version. If you haven't bought it yet, go get the pattern for the two beautiful pillows.

Share
Tweet
Pin
No comments
I have a video to show you. Please notice, it is NOT a full tutorial :)


See, what just happened?

Share
Tweet
Pin
No comments
Picky Pillow. Supports you when you crochet or knit.
The Picky Pillow pattern is now available. The pillow is designed to support you when you crochet or knit - or just want to relax.

Picky Pillow. Supports you when you crochet or knit.

The Tunisian twisted stitch pattern is used and a full photo tutorial for this is included in the pattern, so all you have to know in advance, is the Tunisian simple stitch and how to do regular single crochet.

NOTICE

For a limited time only, the pattern is available at an INTRODUCTION PRICE.

...AND if you buy it now, then make sure you are logged in, as you should then automatically get access to updates. You might be happy about that later on... hint, hint.

Buy the Pattern

The pattern is available in English (US terms) from Ravelry and LoveCrafts. It is also available in Danish, where it is called 'Pernitten Pude'. Find the Danish version at LoveCrafts and Ravelry.

About the Pattern

As usual you get a pattern with lots of photos and guidance helping you out.

Cro-hook

The main part of the pillow is worked in rows back and forward. You will need a cro-hook / double-ended hook for this. With or without cable. This also means that the length of your cro-hook doesn't matter much, as you don't have to do a full forward pass before you start a return pass.

The Tunisian Twisted Stitch Pattern

Inner Pillow

In the pattern I suggest using an inner pillow. This is optional as the stitches are tight enough to hold the filling in. Personally I think and inner pillow gives you a more expensive-looking pillow, and it will of course also help the pillow stay in shape. So instructions for making an inner pillow are included. And it is NOT difficult to make one.

Adjustable

The pattern also includes instructions for adjusting the pillow size any way you want. So it can fit any inner pillow you have already or whatever you decide you need.

Testers

It has been quite a journey to make this pattern. No less than three testers have helped me out and once again, I'm surprised how much testing can improve a pattern. Thank you to Marjolein, Ewa, and Karen!

Selling Finished Products

Yes, you can do that. No problem! Read more in the menu: About > Copyright, Selling and Affiliate Links

Picky Pillow.

If you have any questions, just ask. You can find me here, on Ravelry or Facebook.
Share
Tweet
Pin
No comments
Some Tunisian patterns are easy to do, when you work in rounds, while doing rows are considered impossible, or something that requires sewing in a lot of ends.


It's just not at all impossible. Nor do you need to cut the yarn and sew in ends all the time.

Share
Tweet
Pin
No comments
Add Colors to the Tunisian Twisted Stitch Pattern
Wow! The rarely used twisted stitch pattern looks fantastic using more colors! I didn't even realize that until Chanette asked for more colors...

Add Colors to the Tunisian Twisted Stitch Pattern

I'll show you, how you add more color to this stitch pattern row by row.
Share
Tweet
Pin
2 comments
I was asked about the washcloth / dishcloth I made for the slip stitch tutorial.

Color Stacking - Crochet

I used Color Stacking which is a member of the Planned Pooling family. A great way to have fun with colors. The tutorial here helps you with your first color stacking project.

Share
Tweet
Pin
3 comments
Tunisian Crochet. Knit Stitch. Left side increase.
Learn how to make a nice Tunisian knit stitch increase at the left side (or right side, if you are left-handed).

Tunisian Crochet. Knit Stitch. Left side increase.

I'm experimenting with mitered corners and have developed a way to do the left side increase without it being too tight and knotted.

Share
Tweet
Pin
1 comments
Beaded Crochet Rope Necklace
Do you know how to make a beaded crochet rope necklace? I recently found some, I made years ago and I remember, how much fun they were to make and how pretty they got.

Beaded Crochet Rope Necklace

They are perfect for Summer crafts and you can find an incredible amount of fantastic patterns for the beaded crochet ropes.

Learn How To

The first rounds are confusing and they might make you incredibly frustrated. I sometimes start over again and again - especially if I crochet with one color beads. Once you got the first rows, the rest of the beaded crochet necklace is easy to make.

It can be difficult to find good tutorials, but I've hand-picked some, that can help you get started. The tutorials I've found are clever and use different colored beads.

Also notice that some tutorials start with a row of regular chains (without using beads yet) and make a circle with this, while other tutorials will get right on to using the beads.

You will need:
  • beads (see later about beads)
  • thin crochet hook, maybe around 2mm (US 0, UK14) The smaller your beads, the tinier the hook.
  • a strong thread in a color that matches the beads (or a contrasting color for the first sample)
  • needle to put the beads on the thread
  • Optional: end caps and a lock - or be creative.

Practice with HAMA beadsYou can practice with huge beads like HAMA beads for children. It will make it easier for you to see, what you are doing. Use a 3mm (US C/D, UK11) hook or likewise.

Animation Tutorial

If you are impatient, I found this simple page on Fiosarterapia that explains the different steps with only 5 animations. The first animation shows how to make the first round of stitches including beads. The other animations show the 4 steps you need for doing sc with each bead:
  1. Insert hook
  2. push the already attached bead to the side
  3. make the next bead ready on the loose end
    (push the loose end over the already attached bead)
  4. finalize your sc

Photo/Image Tutorials

Fusion Beads has good and lots of images. Just don't get paralyzed when you see the number of images. Step 1-10 is enough for a good start. Step 16 shows how to join the ends of the first row to make a circle, and then you might only need to look at steps 17-19 to know how to do all the rest of the beads.

Making Beaded Jewelry got great photos and text. Here is how to crochet over beads (for the first round), and for the rest of the beaded rope, follow the How to Crochet Beaded Ropes tutorial.

Video Tutorials

A great and very straightforward video tutorial is made by Beadaholic. The actual tutorial starts around 3:15.

Ann Benson made a detailed youtube video tutorial that starts with info about what you need and a couple of great tips too. Around 3:12 the 'real' tutorial starts by showing how to make the first row of stitches. She uses nice animations as well as short videos to show the details.

Finalize the Necklace

Only some tutorials show how to end the rope. You can do this, just like you would end another crocheted project. Make a slip stitch, cut the thread and pull it through. You decide whether to attach end caps or not. There are many options. Be creative.

Another way to finalize a necklace


About Beads

The more perfect beads you have, the easier to get a perfect outcome. The beads have to be 'perfect' in the way that they should be very similar in size and shape. Because when you are new at this you might crochet pretty tight and then uneven beads will give you a messy looking rope. When you get more advanced, you can mix bead sizes in a controlled way to make more complex ropes.

About beads

Useful Links 

When you are familiar with the rope technique, I found some good links on biser.info. It is a Russian page, but with lots of great photos. It will bring you joy and hours of work:
  • A collection of patterns and images of beaded crochet ropes.
  • Photo tutorial on how to split a crochet rope into two.
  • Photo tutorial on how to make a twisted spiral shape on the crochet rope (use Google Translate to get the whole meaning)

Updated May 2020
Share
Tweet
Pin
No comments
Older Posts

Newsletter

Don't miss the next tip or pattern
from StoneGnome.

Find StoneGnome at

  • Ravelry
  • LoveCrafts
  • Littlebugz

  • Facebook
  • YouTube
  • Pinterest
  • Instagram

Popular Posts

  • Tunisian Crochet Cast On
  • Free Snowflake Pattern
  • Tunisian Single Hook Cast On
  • A Valentines Heart for You
  • Avoid an Ugly Slip Knot

Labels

advanced amigurumi basic beads Bornholm christmas crochet crochetChart easter edge felting filetcrochet freePattern guide hat miteredCorner ornament paidPattern pattern ribbing shoes slipStitch spiral Split Crochet stitchPattern topStitch tunisian tutorial

recent posts

My favorite Links

  • My designs at LoveCrafts
  • My designs at Ravelry
  • My design page at Littlebugz.dk
  • Annie's Catalog
  • Designing Vashti
  • Crochet Kim
  • Free Vintage Crochet
  • Stitch Fiddle
  • Stitchboard · Pattern Wizard
FOLLOW STONEGNOME @INSTAGRAM

    Powered by Juicer.io

Ⓒ StoneGnome · Created with · by BeautyTemplates