If you haven't met the cute Junior Egg already, let me introduce you now. He/she likes to sit in a nest of yarn - or hang from a twig or a tree. And the Junior Egg pattern is free!

We loved it! We thought the result was eggcellent. An egg with a lot of personality. So I thought. Why not make a crochet version?
Abbreviations (US terms)
Materials
- Hook size 2-2.5mm (US 0-B1, UK 14-13)
- Scissors
- A long piece of scrap yarn to use a stitch marker
- Filling
Yarn
Cotton yarn with yardage around 170m/50gr (186y/1.76oz)
A tiny bit of white and orange.Spiral Note
The egg and leg are worked in a spiral. Working in a spiral means working in continuous rounds without ending each round with a slip stitch. Put your scrap yarn stitch marker in place, when a round is done, and continue with the next round immediately. The yarn stitch marker show what round you are working on.
The egg and leg are worked in a spiral. Working in a spiral means working in continuous rounds without ending each round with a slip stitch. Put your scrap yarn stitch marker in place, when a round is done, and continue with the next round immediately. The yarn stitch marker show what round you are working on.
Abbreviations (US terms)
- ch = chain
- sc = single crochet
- inc = increase. Make two sc in the same stitch.
- dec = decrease. Work 2 sc together.
- () = repeat instructions between parentheses as many times as directed – OR throughout the round/row.
- [] = the number of stitches in a round or row.

Junior Egg Pattern
Work in a spiral.- Begin with 5sc in a magic ring. Pull tight. [5]
- 1 inc in each stitch all the way. [10]
- (inc, 1 sc) 5 times. [15]
- (sc, inc, sc) 5 times. [20]
- (inc, 3 sc) 5 times. [25]
- (2 sc, inc, 2 sc) 5 times. [30]
- (inc, 5 sc) 5 times. [35]
For shaping the top of the egg, I recommend invisible decreases*: Insert the hook into the front loops of the next 2 stitches right after each other (do not yarn-over in between). Yarn-over and pull through two loops. Yarn-over and pull through the last loop.
*Don't make invisible decreases if you plan to turn the backside out like I sometimes to do.
Closing Off the Egg
Cut a long yarn end. Expand the loop on the hook and pull until the yarn end is out and the work secured.- 1 sc, (dec, 15 sc) 2 times. [33]
- (9 sc, dec) 3 times. [30]
- (4 sc, dec, 4 sc) 3 times. [27]
- (7 sc, dec) 3 times. [24]
- (3 sc, dec, 3 sc) 3 times. [21]
- (5 sc, dec) 3 times. [18]
- (2 sc, dec, 2 sc) 3 times. [15]
- (1 sc, dec) 5 times. [10]
Closing Off the Egg
Attach a needle to the yarn end. Insert the needle into the front loop of every stitch all the way around (9 stitches). Pull tight and the hole closes.
Only if needed, secure the yarn again, by weaving it in and out a couple of times.
Use the yarn end for hanging the egg on a twig.Related blog post: The Easter Bunny Egg pattern

Bunny Egg & Junior Egg
Leg
Work in a spiral.Foundation option #1: Ch 5. Slip stitch it into a ring. [5]
Foundation option #2: Magic Ring with 5 sc. [5]
1-6) Sc all the way for 6 rounds.


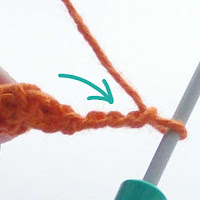
7) Toe: Ch 4.


8) Use the back bumps of the chains. Skip the first and slip stitch into the next three.

9) Slip stitch into the middle of the foot through front and backside.


10) - 11) Repeat line 7-8.
12) Slip stitch into the left side of the foot.

12) Slip stitch into the left side of the foot.

13) - 14) Repeat line 7-8.
15) Slip stitch into the side of the foot again.

15) Slip stitch into the side of the foot again.

Cut a long yarn end and pull the yarn end through the slip stitch.
Pull the yarn through the leg, so both yarn ends are at the top of the leg. (Find the nearest ’hole’ to pull it through. Use a needle or your hook).
Make another leg.
Sew the legs on the egg. Place them somewhat on the same side. ’Fold’ the legs, with the toes pointing forward and the ’knees’ slightly bend.

Thank you to Sofiia Norah Rasmussen for helping me test this with short, short notice.
If you want ideas of how to make a colored version, then check what Margie did on Instagram and give her a little love.
Enjoy!
Note. The original blog post is from March 2017. The latest update is of March 2021.
Share and Selling Note
You are welcome to share or sell any products you make from my patterns. :)
Read more about copyright and selling here.
You are welcome to share or sell any products you make from my patterns. :)
Read more about copyright and selling here.


2 comments
What cute Easter gifts these would be. Instead of coloring real eggs, I'll give these out with fabric markers to decorate. Thank you!
ReplyDeleteI'm so happy you like them :)
DeleteI’d love to hear your thoughts! ❤️
If I don’t reply to a question here, feel free to reach out via the contact page :)