I have always admired, when knitters did a cast on and 1-2-3 got thousands of loops on their hooks... eh, needles.
You can also cast on when doing Tunisian crochet - as in without a starting chain. And it is much faster than doing chains first.
The technique described here requires two hooks. It is also possible to use one hook only, but I will write about that in a separate blog post.
I originally saw Kim Guzman do the two-hooks-cast-on in a video. And I've only seen her do it, let alone talk about it. Everything else called cast on, always shows to be foundation rows made from chains.
I'm doing this slightly differently than Kim. I'm holding the hooks differently as I find this much easier, so I will encourage you to see both hers and my video to get the full story, plus see, what technique works better for you. (Her video links are further down)
There are two ways of beginning. I prefer the no-knot solution. Either way, you need two loops to begin with, one on each hook.
When you have enough, take the single loop from your working hook and gently push it onto the hook with all the other loops.
If you've done this part with a bigger hook, then transfer your loops to another hook now.
In case you don't recognize the sample made with chains for the foundation. It is made by hooking into the back bump of the chains. This gives you a nice edge/border.
I have also done minor testing of the flexibility. In the grey sample in the video, I've used 8mm hooks for the cast-on - making the loops somewhat tight - and then transferred the loops to a 6mm hook before doing the return pass and the next rows. In that, case I got a similar flexibility as with a regular foundation row of chains. If I concentrate on doing a very loose cast on, I don't need a 2mm bigger hook.
You can also cast on when doing Tunisian crochet - as in without a starting chain. And it is much faster than doing chains first.
The technique described here requires two hooks. It is also possible to use one hook only, but I will write about that in a separate blog post.
I originally saw Kim Guzman do the two-hooks-cast-on in a video. And I've only seen her do it, let alone talk about it. Everything else called cast on, always shows to be foundation rows made from chains.
I'm doing this slightly differently than Kim. I'm holding the hooks differently as I find this much easier, so I will encourage you to see both hers and my video to get the full story, plus see, what technique works better for you. (Her video links are further down)
Points to Notice
- Keep your tension loose or consider going up 1-2mm in hook size.
- When counting, all loops count. Including the single loop at the working hook.
Tutorial
See the video to see all the steps. Use the brief notes on this page, as reminders in the future.There are two ways of beginning. I prefer the no-knot solution. Either way, you need two loops to begin with, one on each hook.
Normal Start
- Make a slip knot.
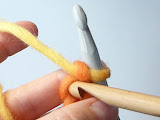
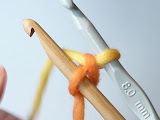
- Insert both hooks into the slip knot. (img #1)
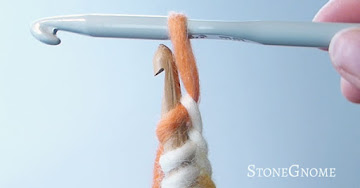
- With working hook: get behind the other hook, yarn over (YO) and pull through a loop. (img #2-3)
Knotless Start
- Make a very loose slip knot.
- Insert the first hook into the ordinary loop of the slip knot.
- Insert the second hook into a bump, which is part of the knot.
Cast On
This part is pretty easy. Line up the hooks next to each other (Kim crosses them).- Pull the working yarn all around both hooks.
- Pull through a loop with your working hook.
If you've done this part with a bigger hook, then transfer your loops to another hook now.
Video
Comparing
See the video for a comparison of two samples. The chain-like bottom goes in different directions.In case you don't recognize the sample made with chains for the foundation. It is made by hooking into the back bump of the chains. This gives you a nice edge/border.
I have also done minor testing of the flexibility. In the grey sample in the video, I've used 8mm hooks for the cast-on - making the loops somewhat tight - and then transferred the loops to a 6mm hook before doing the return pass and the next rows. In that, case I got a similar flexibility as with a regular foundation row of chains. If I concentrate on doing a very loose cast on, I don't need a 2mm bigger hook.
Related post: Tunisian Single Hook Cast On


7 comments
I'm definitely trying this. Thank you!
ReplyDeleteI'm definitely trying this. Thank you!
ReplyDeleteCasting onto a bigger hook then transferring to the desired one is super easy if you use an interchangeable cabled hook for the bigger one. Cast on, shift all the stitches down onto the cable, then swap hook heads.
ReplyDeleteThanks for the tip about how to switch the hooks. Adding options to the toolbox is good!
DeleteThis is great; I really appreciate it! I did look at Kim's video and method, but found your method of holding the hooks & yarn to suit my style better. Does it help to use a larger hook for the one performing the casting, or should the larger hook be the one that the stitches all end up on?
ReplyDeleteGlad to hear it worked for you :)
DeleteThe size of the loops is decided by the hook at the left and the chain-like stitches that will be the border/edge of the work is decided by the hook at the right.
So, it makes sense to keep them at the same size, however sometimes you might want to play with either a looser border or a looser first row without getting a loose border.
Thanks - I appreciate your very clear answer!!
DeleteI’d love to hear your thoughts! ❤️
If I don’t reply to a question here, feel free to reach out via the contact page :)