StoneGnome

Crochet Love · Crochet & Tunisian Crochet · Studying, Developing, and Teaching Crochet Techniques

  • Home/Blog
  • Crochet
    • Basic Skills
    • Beyond the Basics
    • Advanced Crochet
    • Stitches and Stitch Patterns
  • Tunisian Crochet
    • Basic Tunisian Skills
    • Beyond the Basics
    • Advanced Tunisian Skills
    • Stitches and Stitch Patterns
  • Tutorials n Guides
    • Guides
    • Step by Step Tutorials
    • Stitches and Stitch Patterns
  • Patterns
    • Pattern Posts
    • StoneGnome Shop ♥
    • Visit Ravelry
    • Visit LoveCrafts
  • Themes
    • Slip Stitches (ss)
    • Felting
    • Hats
    • Ribbing
    • Waistcoat stitch Love
    • Top Stitch
    • Amigurumi
    • Small Hearts
    • Ornaments
    • Seasonal Themes n more
  • About
    • Contact Me
    • Copyright and Selling
    • Personal Data & Privacy
Crochet with 3 strands of yarn
Working with 3 strands at once is faster and creates a softer, more unique texture compared to a single bulky yarn - and you might save yarn too. 

Crochet with 3 strands of yarn

Here, you'll find helpful tips on yarn usage, hook size, and more to make the process smoother!

Contrary to what you might think, crocheting with 3 strands doesn’t mean juggling 3 separate yarn balls. In fact, you can work with just one yarn ball, avoiding the mess altogether.

It’s not as tricky as it sounds, but it helps to be comfortable with your stitches to avoid confusion with the extra strands.

This post was originally published in March 2018 and was re-written as of October 2024.

Comparison. Regular vs 3-strand Yarn

Below, I’ve compared a regular wool yarn with a 3-strand wool yarn. Both have the same (total) weight per length, and the single crochet stitch rows were made with the same hook.

Spot the difference: Regular yarn vs 3-strand yarn

You’ll notice that the 3-strand yarn creates a slightly fluffier texture, taking up a bit more space than the regular yarn, even though their weight is the same.

Guide - Avoid the Mess

You can create 3 strands from a single skein or ball, preventing the tangles you’d get from using 3 separate balls. To do this, fold the yarn to triple it, as shown in the photo, and make the tripled yarn long - longer than what’s shown. I prefer making it at least 1 meter (40 inches) at a time.

Tripling the yarn

Make your slip knot as usual - or skip it* - and begin your project. 

*Read more: Avoid an Ugly Slip Knot

Running out of yarn

Eventually, you’ll run out of  3-stranded yarn. 

Pull up more strands

Simply pull on the end of your working yarn so it unfolds from the loop. Keep pulling until you have another long section of 3-stranded yarn to work with.

If you prefer a video demonstration, Ira Rot has a helpful video tutorial for this technique.

TIPS

A few tips to make your projects easier:

Hide Folding Points

In most cases, the points where you fold the yarn won’t show in the final project. However, if you’re working on a particularly delicate or detailed project, it is possible to hide them. You can either adjust the tension slightly, which will move the folding point. - Or - if the folded point lands on the front loop, simply remove the loop from your hook and turn it around so that the front loop becomes the back loop.

Read more: How to Change and Control Your Tension

Avoid Twisted Strands

Twisted strands will look different from not-twisted strands. It can affect the way they 'Fluff'. To keep the strands straight and airy, straighten them whenever you notice a twist. This extra attention can help maintain a special texture that adds extra to certain projects.

Hook Size

When comparing 3 strands to a same-weight regular yarn, a good rule of thumb is to use the same hook size. However, you might also benefit from using a hook 1-2 sizes larger (1-2 mm) since the fluffiness fills in the stitches differently and takes up more space making your project look more substantial without extra material.

Yarn Usage

A larger hook size, also means you may need a little less yarn for your project—not a bad bonus!

Again - it all depends on your project, though totally worth to try.

Perfect for...

3-stranded yarn is particularly well-suited for looser and more open stitch patterns or in exchange for a bulky yarn.
Read more: Comfy Crochet Footies

In open stitch patterns, you’ll really see the difference compared to using regular yarn. Some great stitch patterns to try include the Moss Stitch (and for my Danish readers: 'vævehækling') or the Tunisian Full Stitch. But don’t limit yourself—feel free to experiment with any stitch pattern!


Regular crochet moss stitch and Tunisian full stitch
Left: Moss Stitch in regular crochet. Right: Tunisian Full Stitch

I’ve worked on several projects using the 3-stranded crochet technique, and I absolutely love the texture and feel it creates. Check out how 3 strands look with the Tunisian Reverse Stitch.

I haven’t tried felting with this method yet, but it seems promising - definitely something to experiment with in the future!

Enjoy

The latest StoneGnome pattern where you can use the 3-stranded technique is the Comfy Crochet Footies.
Comfy Crochet Footies

Enjoy exploring this completely new world of textures and styles you can create with 3 strands of yarn.

Share
Pin
2 comments

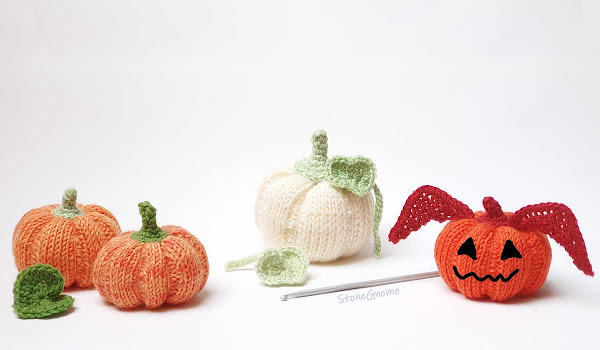
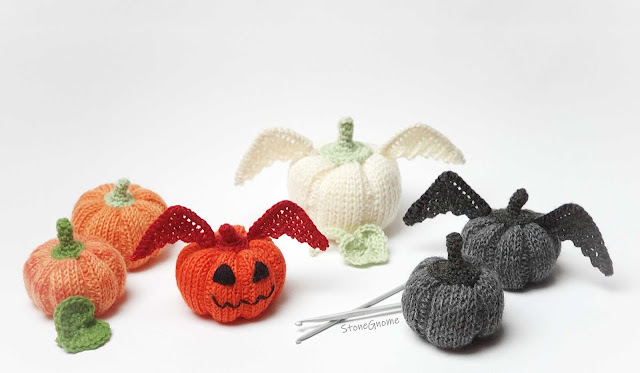
Crochet a Halloween Pumpkin. Make it happily orange, stylish, or scary.

Crochet Halloween Pumpkin

Add eyes and a mouth to your pumpkins for a playful touch, or let them keep a chic and neat look.

Updated September 2023.
The pattern has been tweaked and a few helpful images have been added.

The pattern has two pumpkin variations with stem and blossom. It also includes a leaf and wings. A small (optional) twist makes the wings mirrored.

The Halloween Pumpkin pattern includes a lot of helpful images - and is available in English and Danish.

Purchase the pattern now, right here: Buy Now

Or visit Ravelry, LoveCrochet, or the StoneGnome Shop.

Skills Needed

All the minor parts are made with regular crochet stitches. 

The body/head of the pumpkin is made with Tunisian crochet stitches. If you don't know Tunisian crochet, don't worry. You will only need to learn a couple of basic Tunisian crochet stitches to make this, and it can be made with a regular crochet hook (with no handle).

Halloween crochet pumpkins

Reverse Stitches

This is totally optional. But if you want to make the wings truly mirrored, a few unusual stitches are explained in the pattern.

I've borrowed the technique from Tunisian crochet where they are called 'reverse stitches'. However, it is different from the kind of reverse stitches we usually relate to, when we do regular crochet. 

See more in the pattern or check this out: Another kind of Reversed Stitches.

Happy Halloween!

Share
Pin
No comments

Amigurumi and Tunisian Crochet arent’ something you very often think about as related. However, Tunisian crochet can be a very good choice for making nice and soft amigurumi.

Tunisian crochet Pumpkin

I missed working with Tunisian crochet stitches. Then I got inspired by our creative kids (age 6 and 8) to make a pumpkin.

UPDATE. This pattern has been updated with extra items and features. Read more here.

The body of the pumpkin is made of Tunisian crochet stitches. The stem and the blossom end are regular crochet.
Tunisian crochet Amigurumi

Yarn.
I recommend the wool yarn blend Scheepjes Metropolis. It’s very very nice to work with and supports the softness of the Tunisian crochet stitches that makes the pumpkin nice to hold.

Size. The pumpkin will be around 7cm tall and wide (2.8”) with the suggested yarn here.

Currently, you can purchase the Pumpkin Pattern at Ravelry and at LoveCrafts.
- OR -
Find the pumpkin at my payhip store and get it for FREE when you use the coupon code PUMPKIN
(The coupon code expires November 1st 2021.)

Happy Halloween!


Share
Pin
No comments
Tunisian Crochet is fun and can be very meditative. Here is how you make a traditional foundation row to get started.
Tunisian Crochet Founcation Row

If you are a newbie to Tunisian Crochet, try it!

Updated September 2021. Originally posted as part of the Tutorial: Tunisian Top Stitch from 2016.

Tunisian Crochet in General

Is this your first try on Tunisian Crochet? If so, you should know it is all about a forward motion/ forward pass and a back motion/return pass. On the forward pass, you pick up loops. On the return pass, you finalize each of the crochet stitches.

You also insert the hook a little different from regular crochet in most cases - as you have other options here - which makes the stitches look a bit different too.

However, the way you work each of the stitches is still crocheting.

The outcome of a Tunisian Crochet piece can be a lot more like knitting, which is great for the drape and thereby for making wearables, scarfs, and other soft crochet pieces.

Tunisian Foundation Row

Choose a yarn and a hook that is at least two sizes bigger than the yarn label suggests. Most hooks will easily have space for 10 stitches on the neck. Else, just make fewer chains in this tutorial.

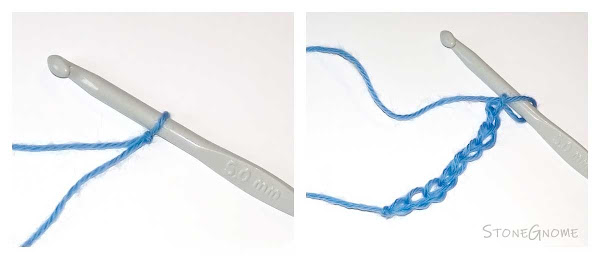
1) Chain row
Make a slip stitch and insert the hook. Crochet 9 chains for a foundation. This will give you 10 stitches, as the loop on your hook is number 10.
Tunisian Crochet Chain Row

Now turn your work sideways, so you can see all the bumps that might usually be on the back of your work. These are the loops you will insert the hook into.
Tunisian Crochet - hook into the back bumps

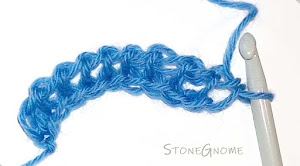
2) Forward Pass - pick up loops
Insert your hook into the first bump, right next to the hook. (Some skip the first bump and it CAN be difficult to hook into. So if it suits you better, do that.)

Yarn over (yo) and pull through one loop. You now have 2 loops on the hook. They stay there during the forward motion.

Tunisian Crochet - make the first stitch


*Insert the hook into the next bump, yo, and pull through one loop only.* Repeat this till you have used all bumps. When you have reached the end, you have 10 loops on your hook.
Tunisian Crochet - forward pass

3) Return Pass - complete each stitch
Chain one. (Yo and pull through one loop only). This is the left edge of your work.
Tunisian Crochet - left edge

*Yo and pull through two loops.* Repeat until you only have one loop left on the hook.
Tunisian Crochet - return pass

AVOID the temptation to pull tight, when there is only one loop left on the hook. You can tighten your work so much, that it is difficult to proceed from here with a nice result.

Tunisian Crochet - Foundation Row

Tadaa!! Now you are ready for your next row :)

From here most people learn the Tunisian Simple Stitch (tss), the most commonly known stitch in the Tunisian Crochet world.

You could also try something nice and a bit different like the lovely Tunisian Top Stitch. It's one of my favorite stitches and it doesn't get enough attention in the crochet world.

You will find a tutorial right here: Tutorial: Tunisian Top Stitch

Did You Know?

Instead of starting with a chain row, it is also possible to do a cast-on. You can either do the Tunisian Single Hook cast on or the Tunisian Crochet Cast On. The last one requires two hooks but is really beautiful and very popular on this site.

Tunisian Crochet Cast On - Single Hook
Tunisian Crochet Cast On - Two Hooks

Choose whatever works best for you with a specific Tunisian Crochet Project.
Share
Pin
No comments
Learn to crochet the Tunisian top stitch - aka bump stitch. It is a VERY easy stitch and the stitch is also very fast to work with. You crochet beautiful scarfs and more with this stitch.
Tunisian Crochet Top Stitch Tutorial

If you are new to Tunisian crochet, this is a great stitch to learn, as it is very different from other Tunisian crochet stitches.

Updated and split into two posts in September 2021. Originally from September 2016.
     

Tunisian Top Stitch

Choose a yarn and a hook that is at least two sizes bigger than the yarn label suggests. Make a foundation row of just about 10 chains - or cast on if you prefer that. Now you are ready for the first row of Tunisian Crochet Top Stitches.

Tunisian Crochet first row
Related posts:
- Tunisian Crochet Foundation Row
- Tunisian Crochet Cast On (2 hooks)
- Tunisian Single Hook Cast On (1 hook)

Forward Pass

You need to locate and hook into the 'bump' from the return passes. It's on top - and maybe a little behind - the vertical strings, we often use in Tunisian crochet. It is very similar to the back bumps of a chain row you use for a traditional foundation row.

Tilt your work a little if it helps to find the right bump.

If your last stitch of the first row got tight, it might be impossible to see or enter the first bump. So, be careful about that.

1. Insert the hook into the first bump, right next to the hook. Yarn-over (yo) and pull through one loop. You now have 2 loops on the hook. (img below)
Top stitch - insert the hook
2. *Insert the hook into a bump, yo, and pull through one loop only.*
Repeat ** till you have all 10 loops on the hook.

Return Pass

3. Left edge: Chain one (pull through one loop only).

4. *Yo and pull through two loops.*
Repeat ** till you have only 1 loop left on the hook.

You are now done with the second row :) Make a couple more rows just for practice.

Finishing Off

You end it like you do on regular crochet. Cut the yarn end and pull it through the last loop on the hook - at the right side of your work.

Tips

Tip 1. Leave extra long ends when you start and when you finish. Weaving the ends in and out takes more yarn than other stitches.

Tip 2. When you are doing a back motion, then stretch the work a little with your left hand. This gives your work a more uniform look.

Tip 3. In a return pass: When you need to pull yarn from the yarn ball, then hold on to the first loop with your index finger, so you don't accidentally pull the previous bump too tight.

Make a Scarf

Imagine a scarf made purely with the Tunisian Top Stitch. Great drape, right?!
If you want a little extra, then try the 3 Skein Scarf with the neat color change.

Have fun with it :)
Share
Pin
No comments
I've used the lovely Twinkle for my snowflakes and thought I'ld share a few notes with you.

Scheepjes Twinkle Yarn

Share
Pin
No comments
I see a lot of questions these days about how to get circles like Rozeta* - but also squares - to lay flat and avoid the wonky look.
Dahlia Washcloths being a bit wonky
How to avoid the Wonky Look on your crocheted items

There are more things you can do to avoid wavy edges.

Share
Pin
No comments
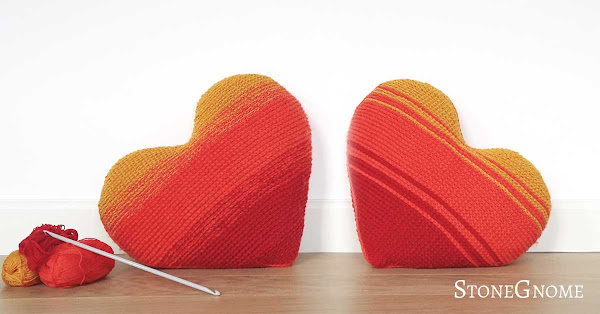
Don't you think a big and a smaller pillow looks good together? The bonus-pages for the Heart on Fire is ready now. This means the pattern now includes a smaller heart too.
Heart on Fire Tunisian crochet pillow pattern - two sizes

Share
Pin
No comments
Tomorrow it is Valentine's Day and everyone deserves at least one heart. Here is one for you. 

Big Valentines Day Pillow - Tunisian crochet

The pattern is free for a while. See the details below.

Share
Pin
No comments
You really don't need that little knot in the beginning of your next crochet project. Here is a video showing how to avoid it.

It works with regular crochet as well as Tunisian and it doesn't matter how you like to hook into your starting chain.

Share
Pin
1 comments
My latest pattern is now available. The hat and tube are square and are very light, despite the bumpy, fluffy look.

Square Bumpy Hat and Tube

It was my 3-year-old daughter, that requested the hat.

Share
Pin
No comments
Sometimes it is difficult to join or sew two pieces together and make it look good.

Tunisian Reverse Stitches - The Sides

If you have ever considered working with the Tunisian Reverse Stitch, you might want to read along here.

Share
Pin
No comments
Most guides about crochet and tension talks about how tight you hold the yarn with your non-dominant hand. This is only half the story, though.

Tunisian Crochet - How to Change and Control your Tension

What you do with the right hand (dominant hand) and what you do with your hook, is also important.

Share
Pin
No comments
What if you want to cast on for your Tunisian project and only have one hook?

Tunisian Crochet Cast On - Single Hook

Here is a way to do that. And this technique might be even easier than the two-hooks casting on.

Share
Pin
2 comments
I have always admired, when knitters did a cast on and 1-2-3 got thousands of loops on their hooks... eh, needles.

Tunisian Crochet Cast On - Chainless

You can also cast on when doing Tunisian crochet - as in without a starting chain. And it is much faster than doing chains first.

Share
Pin
7 comments
Older Posts

Newsletter

Don't miss the next tip or pattern
from StoneGnome.

Find StoneGnome at

  • Ravelry
  • LoveCrafts
  • Littlebugz

  • Facebook
  • YouTube
  • Pinterest
  • Instagram

Loop Legends

  • From Image to Crochet Chart
  • How to Find Your Gauge
  • Mini Neck Warmer
  • Guide: Splitting Yarn
  • You Don't Need a Tunisian Crochet Hook
  • Crochet (Sea)Grass and Succulents
  • Chain Mail Shirt
  • Minor Felting Mishaps

My favorite Links

  • StoneGnome Pattern Shop
  • StoneGnome at Ravelry
  • StoneGnome at LoveCrafts
  • Crochet Kim
  • Annie's Catalog
  • Designing Vashti
  • Stitch Fiddle
  • Stitchboard · Pattern Wizard
  • Free Vintage Crochet

Labels

Bornholm Split Crochet advanced amigurumi basic beads christmas crochet crochetChart easter edge felting filetcrochet freePattern guide hat miteredCorner ornament paidPattern pattern ribbing shoes slipStitch spiral stitchPattern topStitch tunisian tutorial

All Crocheticles

  • ▼  2025 (2)
    • ▼  February (1)
      • Waistcoat Stitch Colorwork
    • ►  January (1)
  • ►  2024 (6)
    • ►  December (1)
    • ►  November (1)
    • ►  October (2)
    • ►  April (1)
    • ►  March (1)
  • ►  2023 (7)
    • ►  September (2)
    • ►  June (2)
    • ►  March (1)
    • ►  February (1)
    • ►  January (1)
  • ►  2022 (3)
    • ►  November (1)
    • ►  April (1)
    • ►  February (1)
  • ►  2021 (9)
    • ►  November (1)
    • ►  October (3)
    • ►  September (2)
    • ►  May (1)
    • ►  March (1)
    • ►  February (1)
  • ►  2020 (15)
    • ►  December (1)
    • ►  November (1)
    • ►  October (2)
    • ►  May (2)
    • ►  March (2)
    • ►  February (3)
    • ►  January (4)
  • ►  2019 (8)
    • ►  December (2)
    • ►  October (2)
    • ►  September (1)
    • ►  May (1)
    • ►  March (1)
    • ►  February (1)
  • ►  2018 (15)
    • ►  June (3)
    • ►  May (1)
    • ►  April (4)
    • ►  March (1)
    • ►  February (4)
    • ►  January (2)
  • ►  2017 (48)
    • ►  December (4)
    • ►  November (3)
    • ►  October (2)
    • ►  September (5)
    • ►  August (5)
    • ►  July (3)
    • ►  June (5)
    • ►  May (3)
    • ►  April (4)
    • ►  March (5)
    • ►  February (5)
    • ►  January (4)
  • ►  2016 (25)
    • ►  December (5)
    • ►  November (7)
    • ►  October (5)
    • ►  September (4)
    • ►  August (4)
FOLLOW STONEGNOME @INSTAGRAM

    Ⓒ StoneGnome · Created with · by BeautyTemplates