StoneGnome

Crochet Love · Crochet & Tunisian Crochet · Studying, Developing, and Teaching Crochet Techniques

  • Home/Blog
  • Crochet
    • Basic Skills
    • Beyond the Basics
    • Advanced Crochet
    • Stitches and Stitch Patterns
  • Tunisian Crochet
    • Basic Tunisian Skills
    • Beyond the Basics
    • Advanced Tunisian Skills
    • Stitches and Stitch Patterns
  • Tutorials n Guides
    • Guides
    • Step by Step Tutorials
    • Stitches and Stitch Patterns
  • Patterns
    • Free Patterns
    • Paid Patterns
  • Themes
    • Felting
    • Hats
    • Ribbing
    • Split Crochet Love (NEW)
    • Slip Stitches (ss)
    • Top Stitch
    • Amigurumi
    • Small Hearts
    • Ornaments
  • About
    • Contact Me
    • Copyright and Selling
    • Personal Data, Cookies and Marketing
Learn to crochet the Tunisian top stitch - aka bump stitch. It is a VERY easy stitch and the stitch is also very fast to work with. You crochet beautiful scarfs and more with this stitch.
Tunisian Crochet Top Stitch Tutorial

If you are new to Tunisian crochet, this is a great stitch to learn, as it is very different from other Tunisian crochet stitches.

Updated and split into two posts in September 2021. Originally from September 2016.
     

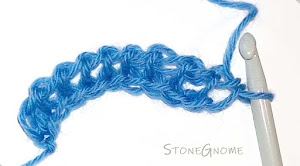
Tunisian Top Stitch

Choose a yarn and a hook that is at least two sizes bigger than the yarn label suggests. Make a foundation row of just about 10 chains - or cast on if you prefer that. Now you are ready for the first row of Tunisian Crochet Top Stitches.

Tunisian Crochet first row
Related posts:
- Tunisian Crochet Foundation Row
- Tunisian Crochet Cast On (2 hooks)
- Tunisian Single Hook Cast On (1 hook)

Forward Pass

You need to locate and hook into the 'bump' from the return passes. It's on top - and maybe a little behind - the vertical strings, we often use in Tunisian crochet. It is very similar to the back bumps of a chain row you use for a traditional foundation row.

Tilt your work a little if it helps to find the right bump.

If your last stitch of the first row got tight, it might be impossible to see or enter the first bump. So, be careful about that.

1. Insert the hook into the first bump, right next to the hook. Yarn-over (yo) and pull through one loop. You now have 2 loops on the hook. (img below)
Top stitch - insert the hook
2. *Insert the hook into a bump, yo, and pull through one loop only.*
Repeat ** till you have all 10 loops on the hook.

Return Pass

3. Left edge: Chain one (pull through one loop only).

4. *Yo and pull through two loops.*
Repeat ** till you have only 1 loop left on the hook.

You are now done with the second row :) Make a couple more rows just for practice.

Finishing Off

You end it like you do on regular crochet. Cut the yarn end and pull it through the last loop on the hook - at the right side of your work.

Tips

Tip 1. Leave extra long ends when you start and when you finish. Weaving the ends in and out takes more yarn than other stitches.

Tip 2. When you are doing a back motion, then stretch the work a little with your left hand. This gives your work a more uniform look.

Tip 3. In a return pass: When you need to pull yarn from the yarn ball, then hold on to the first loop with your index finger, so you don't accidentally pull the previous bump too tight.

Make a Scarf

Imagine a scarf made purely with the Tunisian Top Stitch. Great drape, right?!
If you want a little extra, then try the 3 Skein Scarf with the neat color change.

Have fun with it :)
Share
Tweet
Pin
No comments
Sometimes it is difficult to join or sew two pieces together and make it look good.

Tunisian Reverse Stitches - The Sides

If you have ever considered working with the Tunisian Reverse Stitch, you might want to read along here.

Share
Tweet
Pin
No comments
Some Tunisian patterns are easy to do, when you work in rounds, while doing rows are considered impossible, or something that requires sewing in a lot of ends.


It's just not at all impossible. Nor do you need to cut the yarn and sew in ends all the time.

Share
Tweet
Pin
No comments
Add Colors to the Tunisian Twisted Stitch Pattern
Wow! The rarely used twisted stitch pattern looks fantastic using more colors! I didn't even realize that until Chanette asked for more colors...

Add Colors to the Tunisian Twisted Stitch Pattern

I'll show you, how you add more color to this stitch pattern row by row.
Share
Tweet
Pin
2 comments
Here is a nice and easy-to-do Tunisian stitch pattern for you. It is one of my favorites and I rarely see other using it, which is a shame. Try it, you might love it too.

Twisted Stitch Pattern

I also have a little workaround for you, that helps you close gaps in the left side of your work

Share
Tweet
Pin
No comments
Tunisian Crochet. Knit Stitch. Left side increase.
Learn how to make a nice Tunisian knit stitch increase at the left side (or right side, if you are left-handed).

Tunisian Crochet. Knit Stitch. Left side increase.

I'm experimenting with mitered corners and have developed a way to do the left side increase without it being too tight and knotted.

Share
Tweet
Pin
1 comments
Crocheted Rib Stitch Patterns Did you ever think about how many different crocheted ribbings there exist? I think most of us just do whatever a pattern tells us - or you find a page telling you 'how to crochet a ribbing'. As in one ribbing.
Crocheted Rib Stitch Patterns

Being conscious about the different kinds of ribbing is an advantage, if you want to be able to change an existing pattern or make your own design.

Share
Tweet
Pin
No comments
How to crochet a chain mail
The back of the Tunisian Top Stitch has similarities to a chain mail - at least when using a large hook. I made a chain mail costume for our boy. I'll show you how to make one too.

The project is fast and it doesn't matter, if you make a little mistake here and there. So feel free to try even if you just learned to do the Tunisian Top Stitch.

How to crochet a chain mail This is a detailed guide, not a make-it-in-5-different-sizes pattern. Grab your yarn, measure tape, a shirt of approximately the right size and your creativity.

Share
Tweet
Pin
No comments
I have an excellent new ribbing for you!

I've been playing around with the Top Stich and found a very, very neat way to make an awesome ribbing. I haven't seen it anywhere else. So I dare to call this NEW!
  • Is extremely flexible 
  • It has a very soft structure
  • And the stitch pattern looks great

Share
Tweet
Pin
2 comments
I've always wanted to learn how to crochet with my left hand too. It would definitely give you some advances!

Though - come to think of it. Sometimes it is not necessary. See here how to do a Reversed Tunisian Top Stitch - aka Reversed Bump Stitch.

It is SO easy!
Share
Tweet
Pin
No comments
It doesn't feel long ago since I discovered the Tunisian Top Stich - aka Bump Stitch. This certainly is my favorite Tunisian stitch of today.

Tunisian Top Stitch - Front Side

I've done minor testing on different ways to use it - like for ribbing - and I think the stitch has great potential. Meaning it can unlock new possibilities for Tunisian crochet patterns.

Share
Tweet
Pin
No comments
Older Posts

Newsletter

Don't miss the next tip or pattern
from StoneGnome.

Find StoneGnome at

  • Ravelry
  • LoveCrafts
  • Littlebugz

  • Facebook
  • YouTube
  • Pinterest
  • Instagram

Popular Posts

  • Tunisian Crochet Cast On
  • Free Snowflake Pattern
  • Tunisian Single Hook Cast On
  • Avoid an Ugly Slip Knot
  • A Valentines Heart for You

Labels

advanced amigurumi basic beads Bornholm christmas crochet crochetChart easter edge felting filetcrochet freePattern guide hat miteredCorner ornament paidPattern pattern ribbing shoes slipStitch spiral Split Crochet stitchPattern topStitch tunisian tutorial

recent posts

My favorite Links

  • My designs at LoveCrafts
  • My designs at Ravelry
  • My design page at Littlebugz.dk
  • Annie's Catalog
  • Designing Vashti
  • Crochet Kim
  • Free Vintage Crochet
  • Stitch Fiddle
  • Stitchboard · Pattern Wizard
FOLLOW STONEGNOME @INSTAGRAM

    Powered by Juicer.io

Ⓒ StoneGnome · Created with · by BeautyTemplates