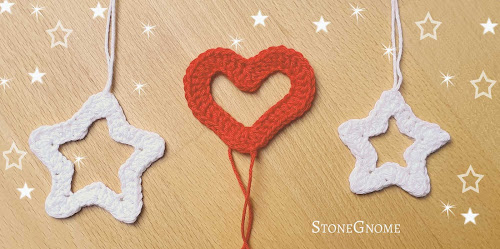
To all the little stars in the world. Crochet a little star or two.
Below is the crocheted star pattern. Have fun ❤️
In a few weeks, it is December 1st. I'm not good at being ahead of the season, but this year my sweet kids started making little ornaments a while ago, so I joined them.
Making the star pattern was a bit frustrating at first. :) Sometimes making things very simple is difficult. I also wanted it to somehow match the Valentine's heart, which can be used as a Christmas decoration as well.
Making the star pattern was a bit frustrating at first. :) Sometimes making things very simple is difficult. I also wanted it to somehow match the Valentine's heart, which can be used as a Christmas decoration as well.
Read more: See more hearts at Stonegnome
I think they will look good together in a window or at the Christmas tree.
Below is the crocheted star pattern. Have fun ❤️
Star Pattern
While working on the pattern it can be difficult to see the star shape. The further you get, the better it should be, and once blocked and shaped, it should be just how you want it.
Little star: around 5cm wide (2")
Medium star: around 6cm wide (2.4").
Medium star: around 6cm wide (2.4").
- hook size 2.25-2.5mm (US: B/1, UK 13)
- cotton yarn. Yardage around 170m/50g (185y/1.76oz)
- optional. A stitch marker.
- glasses, if needed.
Abbreviations (US terms)
ss = slip stitch
ch = chain
hdc = half double crochet
dc = double crochet
tr = treble crochet
yo = yarn over
ch = chain
hdc = half double crochet
dc = double crochet
tr = treble crochet
yo = yarn over
[ ] = instructions for the medium star
Foundation
Chain 30 [medium star, chain 40]. Join with a ss to make a ring.
Optional. Turn the work, so you can see the back bumps of your chains. Hook into the back bumps.
1) chain 3
2) 1 dc and 1 hdc in the base of the 3 chains
3) 1 hdc in the next chain [medium star, repeat the line]
2) 1 dc and 1 hdc in the base of the 3 chains
3) 1 hdc in the next chain [medium star, repeat the line]
Now make a cluster-decrease of two hdc with a skipped chain between. like this:
4) yo, insert the hook into the next chain and pull up a loop
5) skip a chain
6) yo, insert the hook into the next chain and pull up a loop
7) yo and pull through all 5 loops on the hook
5) skip a chain
6) yo, insert the hook into the next chain and pull up a loop
7) yo and pull through all 5 loops on the hook
Continue with:
8) 1 hdc in the next chain [medium star, repeat the line]
Star point
Tip: when working a lot of stitches into a single chain, the chain right AFTER might get very tight. Avoid it being tight by inserting a stitch marker into it before you start the previous group of stitches.
9) (optional. Place a stitch marker in the second chain from the hook)
Make 5 stitches in the next chain (= the first chain from the hook): 1 hdc, 1 dc, 1 tr, 1dc, 1hdc
Make 5 stitches in the next chain (= the first chain from the hook): 1 hdc, 1 dc, 1 tr, 1dc, 1hdc
Continue with:
10) (optional. Remove the stitch marker)
1 hdc in the next chain [medium star, repeat the line]
1 hdc in the next chain [medium star, repeat the line]
Repeat from line 4 until you reach the last star point, which is already halfway done.
(The initial 3 chains you made in the beginning, are substituting the tr.)
11) In the base of the 3 chains make two more stitches: 1hdc, 1dc
Join with a ss, cut the yarn, and secure it by pulling it through the last loop on the hook. Sew in the yarn end from your foundation chain. Make it come out at the top of the star. Use the two yarn ends for hanging up the ornament.
Wash and block* it for a perfect shape and you've got a star!
Let me know if you find any typos in the pattern. ❤️
*Wash and block
I highly recommend blocking for the best final touch.
Handwash the star. Press out excess water by wrapping it in a towel. Place the star on a flat surface and pull the outer and inner star points till you are happy with the shape. Use water-safe needles and a foamboard or likewise if you prefer - I just do it freehand.
The star points can be pointed or more rounded. Let the star dry.
Make a Whole Family of Stars
You might have figured out by now how to make an even bigger star. Every time you add 10 more chains to the foundation row you go up one size. And the line with 1 hdc is also repeated once more (lines 3, 8, 10).
I tried and ended up with 4 different sizes of stars. After blocking and a little nursing, even the bigger one got very good.
I'm not sure how far you can go and keep the shape, but feel free to try :) Just be aware that the larger the star, the more wobbly it will be and you might need to use stiffener if it is to be hung up.
Tag me on Instagram @stonegnomedesign to show me your star(s).
Enjoy!
Sell & Share
You are welcome to sell/share any products you make from my patterns. For further information look at Copyright and Selling


