If you bought the pattern already, remember to get the updated version. If you haven't bought it yet, go get the pattern for the two beautiful pillows.
Wet, cold, hot, sunny, cold, warm. When the weather is indecisive like this, we better be prepared. Here is a UNIQUE 3-piece pattern with hat, cowl, and fingerless gloves.
Did you try the free Evie's - Fingerless Gloves pattern yet? If not, it is still available for free. Try thee gloves and you might want the full set.
If you have ever considered working with the Tunisian Reverse Stitch, you might want to read along here.
The innovative crochet pattern is great as a winter project. Tricky Triangles is a mandala presenting a new way to crochet in the round.
The mandala will be soft and drapey and excellent for making a pillow or you can make it a decorative table topper. There are a lot of other possibilities for hexagons if you google it.
The Mandala
I'm not sure if the level of it is beyond basics or advanced. It might more be a matter of preferences and whether you can find a hook that works for you.
It's colorwork and it requires you to make somewhat uniform stitches. The main stitches are slip stitches and waistcoat stitches. If you are not sure whether these stitches suit you or not, try the FREE introduction pattern Tessa's Triangles first.
Tricky Triangles comes with a 30% introductory discount. The discount is only available on Payhip or Ravelry and runs out in 2 weeks (Nov. 18th Copenhagen time). Use the coupon code TRICK to get the discount.
The mandala pattern is available in English (US terms) and Danish.
Get the pattern at Ravelry, at LoveCrafts, or right here via my new Payhip Store.
Yarn, Hook sizes, and Final Sizes
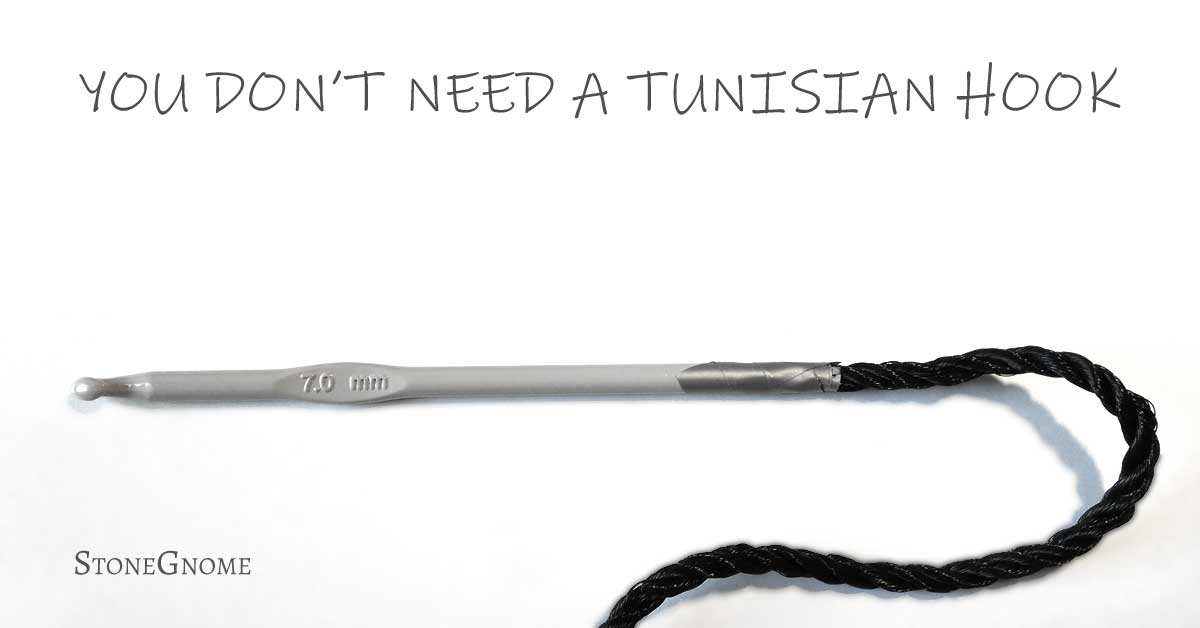
In theory, you can use any three yarn balls and a relatively large hook. Preferably a hook with a relatively small head. For the best result, the yarn should be uniform and soft, with a smooth look.
The yarn I have used is very soft and likable, so I can certainly recommend it.
Peppermint and Licorice
Hook size 5mm (H-8). It gets around 30cm (11.8") wide.
Scheepjes Organicon/Bamboo Soft.
Organicon - 220 Broken Almond
Bamboo Soft – 263 Smokey Diamond (dark)
Bamboo Soft – 264 Antique Silver (grey)
Hook size 5mm (H-8). It gets around 30cm (11.8") wide.
Scheepjes Organicon/Bamboo Soft.
Organicon - 220 Broken Almond
Bamboo Soft – 263 Smokey Diamond (dark)
Bamboo Soft – 264 Antique Silver (grey)
(Big) Red.
Hook size 8mm (L-11). The red is approximately 37cm (14.5") wide.
Scheepjes Merino Soft.
645 Van Eyck (orange)
621 Picasso (red)
623 Rothko (dark red)
Hook size 8mm (L-11). The red is approximately 37cm (14.5") wide.
Scheepjes Merino Soft.
645 Van Eyck (orange)
621 Picasso (red)
623 Rothko (dark red)
Yarn Packages
Littlebugz.dk made yarn packages for both versions. It might be of most relevance if you live in Denmark, Sweden, and Norway - or close. She is good at adding discounts on yarn packages for my patterns.
Have a look at the yarn packages at Littlebugz.
FYI. A lot of the yarn I use is sponsored by Littlebugz.dk. Littlebugz then makes yarn packages for my patterns. And in case you wonder. Littlebugz doesn't sponsor my opinion or anything other than the yarn 😊
Thank You
Thank you to all that have helped me out. Janelle did a great job before it was even a pattern. She helped me with terms and the structure of the written pattern. Then Anita Reinehr came in early to do a superb tech edit. Unusual yes, but with a new thing, it felt important to do a tech edit before having the pattern tested.
Finally, a lot of people did testing. Some just partly, some only on the early Tessa's Triangles. Thank you to all of you too; Pamela Tan, Robyn Kaltea, Ruth Lister, Jess Wells, and more.
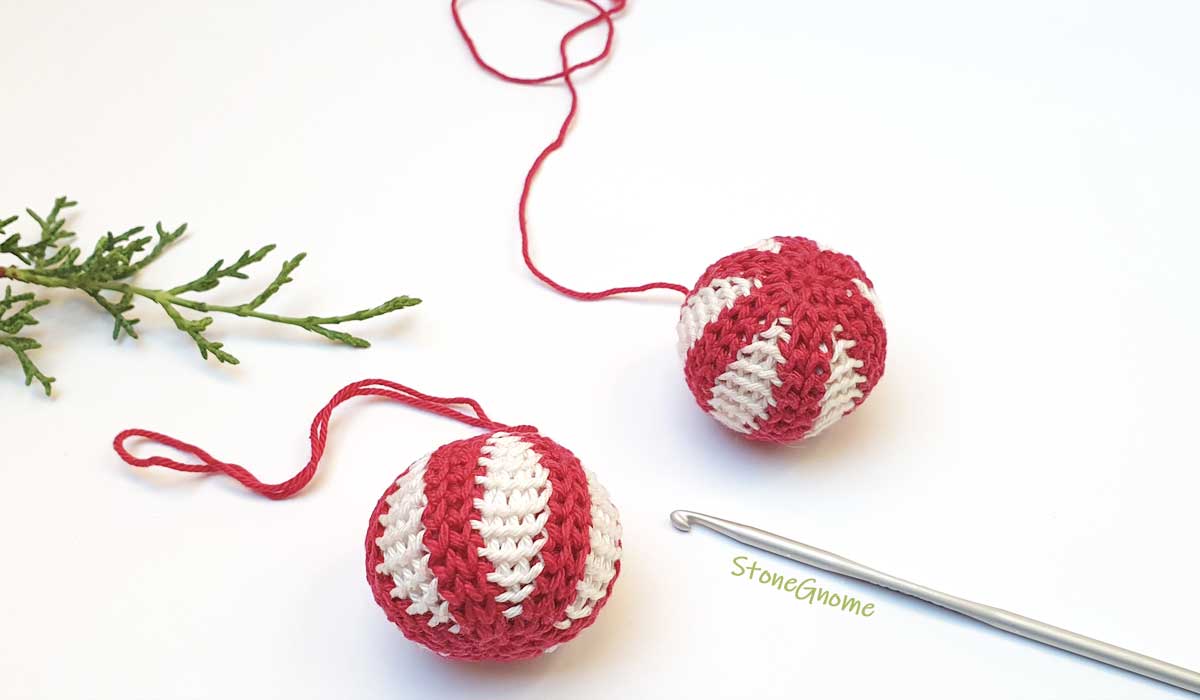
Amigurumi and Tunisian Crochet arent’ something you very often think about as related. However, Tunisian crochet can be a very good choice for making nice and soft amigurumi.
I missed working with Tunisian crochet stitches. Then I got inspired by our creative kids (age 6 and 8) to make a pumpkin.
UPDATE. This pattern has been updated with extra items and features. Read more here.
The body of the pumpkin is made of Tunisian crochet stitches. The stem and the blossom end are regular crochet.
Yarn. I recommend the wool yarn blend Scheepjes Metropolis. It’s very very nice to work with and supports the softness of the Tunisian crochet stitches that makes the pumpkin nice to hold.
Size. The pumpkin will be around 7cm tall and wide (2.8”) with the suggested yarn here.
Currently, you can purchase the Pumpkin Pattern at Ravelry and at LoveCrafts.
- OR -
Find the pumpkin at my payhip store and get it for FREE when you use the coupon code PUMPKIN
(The coupon code expires November 1st 2021.)
Happy Halloween!
Lovely, soft, stretchy, and comfy gloves. Easily made once you get familiar with the stitches.
Half Mittens is the perfect fingerless mittens crochet pattern for most crocheters who like to try new and unique patterns and stitches. It works for rehearsed beginners as well as very advanced crocheters.
NOTE. The Half Mittens crochet pattern was released on February 24th 2024.
I forgot to add it to the website too. Thank you to all who already found and downloaded it.
The mittens are worked bottom-up - from the cuff and up. With a built-in thumb gusset, they are as simple as possible. There are no seams and therefore a minimal number of loose ends to weave in.
AND - Fingerless gloves make it possible to use the mobile.
Pattern Download
The Half Mittens crochet pattern is available here. ADD TO CART.
Or visit and purchase the pattern from
Depending on the source, use the built-in library or save the email you get for future access to the pattern.
Half Mittens Pattern Details
Languages. The pattern is available in English and Danish.
The English pattern uses US terms but it is fairly easy to 'translate' to UK terms. Those few times it says sc (US - single crochet), it should be translated into dc (UK - double crochet stitch).
Sizing. Child (6-8) and Woman (S/M). Tips for altering the sizes are included in the pattern.
Yarn
Find a lovely soft yarn with a little flexibility to get the best gloves ever. This could be a soft Wool Sock yarn blend.
Yarn weight. Fingering (Fingering. 210m/50gr (230y/1.76 oz) or slightly lighter. A heavier yarn can result in a dense and thick fabric.
Yarn usage. One yarn ball of 200-210m is enough for a pair of mittens.
Hook Size
The mittens are designed for a hook size 5mm (US H/8, UK 6).
However, a couple of testers preferred a smaller hook and looser stitches. This is not unusual when working waistcoat stitches. Use what works for you and gives you the required gauge/tension.
Guides and Photos
The pattern includes
- a waistcoat stitch guide
- illustrative photos & helpful tips
- guidance and photos on invisible finishing and weaving in loose ends.
This pattern also has something useful when you want to make the next 10 pairs of Half Mittens:
- an Easy Reference/Cheat Sheet page.
Enjoy creating :)
Copyright and Uses
Feel free to do as you please with any products you make with your own hands from a StoneGnome pattern. Selling and donating are perfectly fine. ❤
Just remember that StoneGnomes designs, including patterns and photos, are copyrighted. However, links to www.stonegnome.com are very much appreciated.
Waistcoat Stitch Secrets
If you want to delve deeper into the waistcoat stitch and discover more than what this crochet pattern offers, visit 'The Waistcoat Stitch Secrets.'
Use it for decoration or as a bookmark.
It’s cold and dark outside. So, have a happy hour with tea, a blanket, and a new little crochet project.
I've worked on different Christmas bauble - or Xmas ball - ornaments the last few years. The first pattern is available below. Yeah!
This blog post has been updated as of November 2023
Skills
The bauble is an intermediate/advanced project. If you are familiar with waistcoat stitches and slip stitches, the Christmas ball pattern is likely trouble-free and you can go straight to the yarn-hook suggestions and the pattern notes.
If the stitches - or the way they are used here - are fairly new to you, a little extra effort might be required to begin with. I promise you, getting to know the stitches better is very well worth it.
Want more details about this way of working? Read: Tessa's Triangles - Hexagon Pattern
You should feel comfortable making uniform stitches of all kinds and it is also good to know how to adjust the tension of your work. - If not, read this one: How to Change and Control Your Tension
A Note about your Hook
A perfect hook for waistcoat stitches has a head that is slightly smaller than the neck and is pointy or has a lip/nose that makes it easy to insert the hook between the legs of the previous stitch.
Remember. We should always use the neck of the hook to determine the size of our stitches - and avoid tightening them after the loop leaves the hook. With waistcoat stitches, it is even more important or it will be difficult to make the following round.
Read about wellformed waistcoat stitches here: Waistcoat Stitch and Stitch Patterns in Rounds.
Yarn-Hook Suggestions
I used:
- Scheepjes Catona (Ravelry) 125m/50gr (138 yds/1.76oz)
- hook size 4mm for the main parts plus a hook size 3mm for the final round (US G6 and D3, UK 8 and 11).
A Catona-ball will be around 5cm (2") wide/tall.
Alternatively use regular cotton yarn for amigurumi with yardage 170m/50gr (186 yds/1.76oz) and hook size 3-3.5mm (US D3-E4, UK 10-9). For the final round use a slightly smaller hook for a nicer closing.
The Striped Bauble Pattern
The bauble is worked in rounds in a continuous spiral. (No joining with a slip stitch after each round).
Make not-tight stitches to make it easy to work with. Be thorough with the size of your chains. Adjust accordingly if needed, like when you change color.
Use a stitch marker or a long piece of yarn to mark the beginning of a round.
Use 3-4 stitch markers or tiny stitch holders for the final round.
Special stitches
Slip stitch BLO decrease (slst-blo-dec). Hook into back loops only (blo). Hook into the next two stitches in reverse order. Yarn-over and pull through all loops. For more info and a video, see Slip Stitch Tutorials - Part III.
Unfinished-ws. Insert the hook between the legs of a stitch, yarn-over and pull up a loop, yarn over, and pull through one loop only. Keep the extra loop on the hook.
Abbreviations
ch = chain
sc = single crochet stitch
ws = waistcoat stitch
ws-c = Ws with a color change (see below)
slst-blo = slip stitch in the Back Loop Only (blo)
sc = single crochet stitch
ws = waistcoat stitch
ws-c = Ws with a color change (see below)
slst-blo = slip stitch in the Back Loop Only (blo)
slst-blo-c = slip stitch BLO with a color change
slst-blo-dec = slip stitch decrease - in the back loop only
* * = Repeat instructions within * * all the way round
( ) = Repeat instructions within the parentheses as many times as instructed.
[ ] = number of stitches in the round
slst-blo-dec = slip stitch decrease - in the back loop only
* * = Repeat instructions within * * all the way round
( ) = Repeat instructions within the parentheses as many times as instructed.
[ ] = number of stitches in the round
Color changes are marked ‘-c’. Change color while pulling up the last loop of a stitch, so the new color is ready for the next stitch. For slip stitches, pick up the new color immediately.
Instructions
Foundation.
With red yarn. Make 6 loose sc in a Magic Ring. Pull the Magic Ring loosely together. [6]
1st Half of the Red Ball
- *1 ws in the first sc,1 ws-c in the same/current sc,
ch-c 1 (change color to red immediately). *
Repeat from * to * all the way. [18] - Keep changing color so all ws appear red and all slst appear white.
* With red. 1 ws in the ws,
1 ws-c in the next stitch.
With white; 1 slst-blo in the chain,
1 slst-blo-c in the ws *.
Repeat all the way. Start the repeats in the CURRENT ws. [24] - This round you will have 3 white slst between the ws.
* 1 ws in the current stitch,
1 ws-c in the next stitch,
1 slst-blo in each slst,
1 slst-blo-c in the ws * [30]
- Repeat round 3. This round you will have 4 white slst. [36]
- Repeat round 3. This round you will have 5 white slst. [42]
2nd Half of the Red Ball
- Begin this round in the ‘current ws’ and make the repeats from the ‘next ws’.
* 1 ws in the ws,
1 ws-c in the next ws,
1 slst-blo in the next 4 slst,
1 slst-blo-c in the last slst * [42] - Repeat the previous round. [42]
Prepare to fill the bauble. Depending on your tension, yarn, and more, the white part might arch inward. Use this if you like - or fill the bauble firmly in the end, if you want a very round ball.
- * 1 ws in the ws,
1 ws-c in the next ws,
1 slst-blo-dec,
1 slst-blo in the next 2 slst,
1 slst-blo-c in the last slst * [36] - * 1 ws in the ws,
1 ws-c in the next ws,
1 slst-blo-dec,
1 slst-blo in the next slst,
1 slst-blo-c in the last slst * [30] - * 1 ws in the ws,
1 ws-c in the next ws,
1 slst-blo-dec,
1 slst-blo-c * [24] - * 1 ws in the ws,
1 ws-c in the next ws,
1 slst-blo-dec-c in the slst. * [18] - * 1 ws in each ws * (Skip all slst). [12]
Final Round
Change to a hook 1 size smaller.
Make 1 ws in the first stitch and unfinished-ws the rest of the way. Every time you have 4 loops (max) on the hook, move 3 loops to a stitch marker /stitch holder (or just a piece of string). The loop you made last, keep that on the hook.
Cut a long yarn end. Pull the yarn end through all the loops on the hook and then all the loops on the stitch markers. Use a needle or a hook.
Fill the bauble - firmly for a round ball.
Tighten the yarn end and use a needle to secure it by going around in the last loops once more.
Insert the needle into the ball and let it emerge from the middle of the 'star'.
Shape the Christmas bauble by hand if needed.
Have a Merry Crochet Christmas!
...Psst!
If you liked this, try other projects using waistcoat and slip stitches. You can find them under the theme Split Crochet.
The stitches are not used much with traditional patterns but are really fun to work with.
Back-Linked Stitches
When doing 'ordinary' linked stitches, you get a visible link at the front of the stitch. Sometimes you don't want that. In that case, I've work out a method, where you use a bump on the back of a stitch to link into.
Back linked stitches. Almost invisible at the front.
See the back side below.
Notice. You can link double crochet (dc) and taller stitches (US terms), though you can also link a dc to a half double crochet stitch (hdc), if the hdc is made first.
Tutorial
Like linked stitches, back-linked stitches are also made by replacing the normal yarn-over (YO) with a link. In back-linked stitches you insert the hook into a bump on the back of the last stitch. Look at the back of a chain stitch. There is a bump there, we will use.Taller stitches usually start with 2 or more YO. Each of these YOs should be replaced with a insert-into-the-back-bump-yo-pull-up-loop.
Foundation. Make a row of 8 chains. Turn with 2 chains. Be careful NOT to tighten the last chain and the loop on the hook too much or you cannot insert the hook in the bump.
Note. The 2nd chain from the hook will be the 'footer' of this 2-chain turn stitch (for regular linked stitches the 3rd chain is the 'footer'.)
- Make the first back-linked stitch by turning your work, so you can see the back of your last chain. Find the first back bump close to the hook and insert the hook here. YO and pull up a loop.
- Skip one chain and insert the hook in the next stitch/chain as you would do with a normal dc. YO and pull up a loop.
- Finalize the dc as usual. *YO and pull through two loops.* Repeat this.
- The back-linked stitch is done. If you count the 2-chain-stitch, there are now 2 stitches in the row.
All the following stitches look alike. Turn your work a little, so you can see and find the back bump closest to the hook.
- Insert the hook in the back bump. YO and pull up a loop.
- Insert the hook it the top of the previous row or chain (as usual). YO and pull up a loop.
- Finalize your stitch as usual. *YO, pull through two loops* until there is only one loop left on the hook.
Turning
Turn with 2 chains. Do not tighten the last chain too much.The first linked stitch can be difficult, if you tighten your chains too much.- Find the back bump of your last chain and insert the hook here. YO and pull up a loop.
- Insert your hook into the next stitch of the previous row (as usual). YO and pull up a loop.
Finalize the stitch as usual with *YO and pull through two loops* twice. Repeat 5)-7) all across for a full row of linked stitches.
Two rows of back-linked stitches.
Video
I know some of you like a video. So I hope this is useful for you. Remember to click like, if you like it and I would also love if you subscribe to more on youtube.The Geeky Note
When I had worked with linked stitches for a short while, something hit me. If you have tried linked stitches with taller stitches and if you know Tunisian crochet by heart, maybe you have seen it too. To me, linked stitches are similar to short rows of Tunisian crochet stitches.Ordinary linked stitches are Tunisian simple stitches and the back-linked version is similar to the Tunisian top stitch - which btw, is one of my favorite Tunisian stitches due to its drape and how it can be used for a flexible rib.
What Name to Use?
So, maybe we could just call linked stitches for short rows of Tunisian simple stitch and the back-linked stitches for short rows of Tunisian top stitch?Well... my problem is that I need to add a disclaimer here. I believe some has argued that linked stitches are NOT Tunisian stitches. I don't see any difference, but now I'm not sure, if we should call them one thing or another - or if the purpose and way of thinking of them can justify two different names.
Funny world, right?
This heart was made for#WorldHeartDay (sep 2022), but it also works perfectly for Valentines Day.
Use the heart to remind you of what is important in your life and what makes you happy. ❤
Written Pattern
Use any yarn and hook that works for you. I used Scheepjes Catona and hook 3.5 mm (US E/4- UK 9)
Abbreviations
(US terms)
ss - slip stitch
ch - chain
sc - single crochet
hdc - half double crochet
dc - double crochet
[ ] - all in the same stitch
Make a Magic Ring. Work 1st round in the Magic Ring.
Round 1
Ch 1, 3 dc, 2 sc, 1 hdc, 1 dc, 1 hdc, 2sc, 3 dc, ch1 and 1 sc in the ring.
Pull the magic ring semi-tight.
Round 2
sc in the chain, (2dc in the next st) x 4,
1 hdc in the sc, 1 hdc in the hdc,
[1 hdc, 1 dc, 1 hdc] in the dc,
1 hdc in the hdc, 1hdc in the sc,
(2dc in the next st) x 4,
1 sc in the chain, 1 ss in the sc.
Pull the magic ring as tight as possible (don't break the yarn). Cut the yarn and pull at the last loop on the hook till the strand is free. Pull tight and weave in ends.
Pattern Chart
If you prefer a chart, then see below. I will post these on Instagram too.
Round 1 starts at the red dotted line. Round 2 starts at the blue dotted line.
❤ StoneGnome
If you want more hearts, then check out my other small heart posts. I love hearts ❤
A cute little hexagon made with unusual stitches.
Make one little hexagon and you have a coaster. Make more hexagons and you can make a bag and with a little patience maybe even a blanket.
Introducing New Techniques
Tessa’s Triangles hexagon pattern is an introductory pattern. Learning how to work these stitches is the key to more advanced patterns. Another pattern is coming up soon at StoneGnome.com. You might also get ideas for making some on your own after making the hexagon.
Tessa’s Triangles is a free pattern and is available in English and Danish.
Get the Pattern
Get the pattern now in StoneGnome’s new Payhip store*, on LoveCrochet, or add it to your library at Ravelry.
*Payhip will ask for your email, but that is only to make sure you get access to the pattern.
Pattern update: The hook conversion in the written pattern should be hook size 5mm = US H-8, as stated in the video tutorial.
If you are happy with using US I-9, then please keep using that.
Want the Newsletter? Find the orange button on this site and sign up for the newsletter.
Tricky Parts
There ARE tricky parts in Tessa’s Triangles. Finding the right spot to insert the hook, when making waistcoat stitches in a round is probably new to pretty much all crocheters. It took me a while to figure out too.
Round 1 is tricky. So much is going on at the same time. Work slowly and take your time.
Cheat tips to get you started.
- Make a one-colored sample to begin with.
- exchange the ws in rnd 1 with loose(!) sc*. (Make ws from rnd 2.)
- make chains instead of slip stitches.
* It will not give you a nice star in the middle.
Anita Reinehr did tech-edit on the pattern and suggested inserting a stitch marker between the legs of every stitch of the first round, to be able to find them. See her photo on Instagram.
Visual Learner?
To support the written pattern, a video is available. Some parts might be easier to do if you see how I do it.
Direct link to the video https://youtu.be/_uiaJC1xGgQ
Share
Share your hexagons. Tag me on Instagram (with @stonegnomedesign) or Facebook (with @stonegnome), so I can see how far you get. Feel free to also tag me, if you run into trouble. Then I’ll do my best to help you out. <3
Have fun with this.
I've always wanted to learn how to crochet with my left hand too. It would definitely give you some advances!
Though - come to think of it. Sometimes it is not necessary. See here how to do a Reversed Tunisian Top Stitch - aka Reversed Bump Stitch.
It is SO easy!
Though - come to think of it. Sometimes it is not necessary. See here how to do a Reversed Tunisian Top Stitch - aka Reversed Bump Stitch.
It is SO easy!
The back of the Tunisian Top Stitch has similarities to a chain mail when using a large hook.
It is perfect for halloween or for any everyday childrens play.
The project is fast and it doesn't matter, if you make a little mistake here and there. So feel free to try even if you just learned to do the Tunisian Top Stitch.
This is a detailed guide. Grab your yarn, measure tape, a shirt of approximately the right size and your creativity.
You need
- scissors - for your yarn only, do NOT cut the sample shirt you found!
- needle for sewing in ends.
- yarn: acrylic is fine.
- yarn weight: DK (133m/50g or 145.5yds/1.76oz)
- I used: Torino from Lane Cervinia - 120g (4.2oz) for a size 3-4 year old.
- at least one size 10mm straight hook with a rubber band around the far end.
- OR - if possible - a Tunisian hook with hooks on both ends (or make your own).
Step 1 - Draw and Measure
Get the measurements from the shirt you want to copy. If you want to adjust anything, do it now.The top stitch is very flexible, so the sizes on my drawing makes the costume large enough to be worn on top of a jacket as well as on top of a regular shirt.
Use Google to convert the cm into inches if you like and if you want the exact same size as I.
I took one of my 3-year olds shirts and added a little length to make room for a side seam slit.
I also changed the neck to an easier one with a slit making plenty of room for my kid's huge head.
And finally I decided to make the arms straight and not too long, as I think this goes well with a chain mail.
Notice: The top stitch likes to stretch. So when you measure the work laying flat down, it should be 10% shorter, as it stretches when worn (due to gravity). Does that 10% explanation make sense to you? If it is supposed to be 40cm (15.75in) long, then make it 36cm (14.2in) when laying flat on a table.
My measurements on the drawing are those I used, when the costumes was laying flat on a table.
AND REMEMBER: We want The BACK of the top stitch. So the side you look at, when you crochet, will be the WRONG side of the final shirt.
Step 2 - Crochet the Front and Back
You can start from the top or the beginning. The top stitch will look the same.I started the shirt from the bottom. I regretted that, as my boy suddenly came by and wanted it to be knee length - and then changed his mind back, when he saw the result. So I had to frog the neck. It would have been easier to frog the part with the side seams. - Or at least to do a reality check on the way down there :)
Anyway - This is how you start from the bottom. Make the side seam parts. Two rectangular pieces of 6x38 cm.
Continue working in a spiral to make the back and then front at the same time: When you have the two rectangles, you start picking up loops on one of them and when you reach the end of the first one, continue on the other piece.
See ChiCrochets video for Tunisian Crochet in the Round.
Ignore that she changes colors. It just makes it easier for you to see, what she does.
If you don't want to do Tunisian in the rounds (or you only have one regular hook), you can make the front and the back separately and then slip stitch them together later.
If you work in a spiral, then remember to stop, when you get to the sleeve openings (make plenty of room here). My work measured 24cm (9.5in)here - laying flat. From here I crocheted in rows. Back and forward. Back side first and then the front side.
Neck
On the front side, I wanted a slit in the neck. Skip this part if you don't want it.5cm (2in) from the measurement target, mark the center of the work for the neck slit. Stop crocheting, when you get to the slit and worked your way back again doing one side first. When done, cut the yarn and do the second part afterwards. This leaves a 5 cm slit in the middle.
Slip Stitch Shoulders Together
Now, stitch the back and the front together on top of the shoulders. You can use a regular slip stitch for that. Remember: You want the WRONG side to be visible. So put the front and back side together, so the wrong sides face each other. That way your slip stitches will be on the back of the costume.Step 3 - The Arms
Remember that the top Stitch likes to stretch lengthwise? Currently there should plenty of room for the armpits. Make sure to pick up stitches anywhere possible, so there keep being plenty of space in the armpit.Pick up stitches for the sleeves everywhere where your arms should be. Then crochet spiral-wise (or back and forward) all the way to the hand.
If you work back and forward in rows, then make the arm as a huge rectangle. The seam should be placed under the arm and will be slip stitched together.
No decreases.
When both arms are done, cut the yarn and pull it through the last loop on the hook. Hide the closing off, when you sew in ends. This shirt is for dressing up, not an everyday garment, so it doesn't matter if it looks a little rough.
Step 4 - Assembly
If you didn't work in a spiral, then you can crochet pieces together now with loose slip stitches. Remember that the BACK side of your work is the one we want to show, so put things together while you watch the front side of your work.Weave in Ends
Loose yarn ends should be woven in. First in one direction for at least 5cm (2inch). Then lock it by turning the needle in the other direction and sew the thread into itself. This will prevent the yarn from getting loose.Tadaa ! Chain Mail done!
Optional - Making Highlights
If you want highlights on the shirt, you can use acrylic paint. It will stiffen the yarn, but nothing serious. Just make sure you don't add too much on the shirt. It will not look good and probably crack and fall off.Put paint on a big brush and wipe the brush off, so there isn't too much paint. Don't put pressure on the brush while painting. Paint in the direction of top to bottom only. Highlights are supposed to look like sunlight and they only come from one direction.
You should rather add a little paint at a time and then do the maneuver several times, than give it too much from the beginning.
Put it on a hanger and let it dry.