Slip Stitch Tutorials - Part I
Learn about slip stitch foundation row, different slip stitches, stitch markers plus links to patterns.
Last week I wrote about the Forgotten Crochet Stitch - aka the very versatile slip stitch. Since then, I've spent hours chatting about it and got requests for tutorials too - especially for video tutorials. So I've got a lot coming up about slip stitches, that will hopefully be helpful.
If you haven't read the Forgotten Crochet Stitch, then please do so. There you can read about the hook, tension, turning and more.
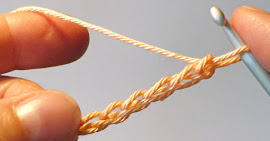
You can watch the video tutorial below. It is made as a knot free foundation row (see the article: Avoid an Ugly Slip Knot).
This is a situation, where it makes huge sense to use a stitch marker, as it takes up space, so the stitch doesn't get too tight.
The video shows how you do them. Remember to keep a very loose tension :)
Focus on two things: keep your yarn in front of the hook and insert your hook from behind.
Notice: There are different ways to do the inverse versions. Like how you insert your hook or grab the yarn in front of your work. Some of it can change the appearance of your work. I'm just showing you some of it here. Main thing for you at first, is that it feels good and you don't hurt yourself. It is easy to tighten the work, when doing inverse/reversed stitches. Take breaks and shake your arm.
You find more links for slip stitch patterns in the blog post The Forgotten Crochet Stitch. Look at the bottom. The wiki I mention there has lots of links to free and paid patterns.
Last week I wrote about the Forgotten Crochet Stitch - aka the very versatile slip stitch. Since then, I've spent hours chatting about it and got requests for tutorials too - especially for video tutorials. So I've got a lot coming up about slip stitches, that will hopefully be helpful.
If you haven't read the Forgotten Crochet Stitch, then please do so. There you can read about the hook, tension, turning and more.
Foundation
I prefer to start slip stitch patterns with a row of chains and then do slip stitch into the back of every chain. It makes the bottom of the work look like slip stitches too.You can watch the video tutorial below. It is made as a knot free foundation row (see the article: Avoid an Ugly Slip Knot).
Stitch Marker
Most of the time, I use stitch markers around the last stitch of every row. Particularly the slip stitch in back loop only can be quite confusing without a stitch marker. See the image for how I place it - around the loop on the hook.This is a situation, where it makes huge sense to use a stitch marker, as it takes up space, so the stitch doesn't get too tight.
Slip Stitch Types
You can hook into- both loops (SS)
- front loop only (SS FLO)
- back loop only (SS BLO)
The video shows how you do them. Remember to keep a very loose tension :)
Inverse Stitches
You can hook into a stitch as usual from the front - or you can hook into it from behind the work. When you do that, it is called a reversed/inverse stitch. Inverse stitches aim to make it look like you crocheted your piece from the back or using your non-dominant hand.Focus on two things: keep your yarn in front of the hook and insert your hook from behind.
Notice: There are different ways to do the inverse versions. Like how you insert your hook or grab the yarn in front of your work. Some of it can change the appearance of your work. I'm just showing you some of it here. Main thing for you at first, is that it feels good and you don't hurt yourself. It is easy to tighten the work, when doing inverse/reversed stitches. Take breaks and shake your arm.
Pattern Links
If you want to try free patterns for slip stitches, here is a couple of suggestions:- Kim Guzman's Hunter's Cowl. It is brilliant, yet very, very simple and fit for a beginner too.
- Kim also has a pattern for a rippled Birth Temperature Blanket made mostly of slip stitches.
You find more links for slip stitch patterns in the blog post The Forgotten Crochet Stitch. Look at the bottom. The wiki I mention there has lots of links to free and paid patterns.


0 comments
I’d love to hear your thoughts! ❤️
If I don’t reply to a question here, feel free to reach out via the contact page :)