Linked Stitches
I'll show you how to link crochet stitches and eliminate the slit between them.
It is very useful, if you want to use a tall stitch for an amigurumi figure or just want another stitch in your stitch collection.
This technique works with double crochet stitches (US term) or taller. When you are doing amigurumi, taller stitches a usually avoided as they naturally comes with holes/slits between the stitches, so your filling fall out.
More people also like the structure of the linked stitches, so try it with a scarf or likewise, where the closed slits might be of a less practical reason and it doesn't matter if you have a loose tension.
Foundation. Make a row of 8 chains.
Turn with 2 chains. The 3rd chain from the hook will be the 'footer' of the 2-chain-turn stitch.
The first linked double crochet (LDC) stitch is done like this:
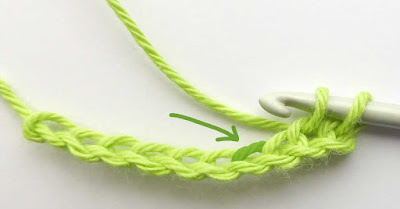
All the following stitches are slightly different from the first. Look for a string almost in the middle of your last done stitch. It is kind of diagonal, sometimes looking horisontal. Insert the hook here and pull up a loop. Do this instead of the normal yarn over.
I have made a tutorial for what I call Back-linked Stitches. Click the link to read it.
It is very useful, if you want to use a tall stitch for an amigurumi figure or just want another stitch in your stitch collection.
This technique works with double crochet stitches (US term) or taller. When you are doing amigurumi, taller stitches a usually avoided as they naturally comes with holes/slits between the stitches, so your filling fall out.
More people also like the structure of the linked stitches, so try it with a scarf or likewise, where the closed slits might be of a less practical reason and it doesn't matter if you have a loose tension.
Tutorial
Linked stitches are made by replacing the normal yarn over (YO) with inserting the hook into a strand in the previous stitch and pull up a loop (or pull through one stitch/loop).Foundation. Make a row of 8 chains.
Turn with 2 chains. The 3rd chain from the hook will be the 'footer' of the 2-chain-turn stitch.
The first linked double crochet (LDC) stitch is done like this:
- Insert the hook in the second stitch from the hook. YO and pull up a loop.
- Skip one chain and insert the hook in the next. YO and pull up a loop.
- Finalize the dc as usual. *YO and pull through two loops.* Repeat this.
- First linked stitch is done.
All the following stitches are slightly different from the first. Look for a string almost in the middle of your last done stitch. It is kind of diagonal, sometimes looking horisontal. Insert the hook here and pull up a loop. Do this instead of the normal yarn over.
- Insert the hook in the diagonal stitch. YO and pull up a loop.
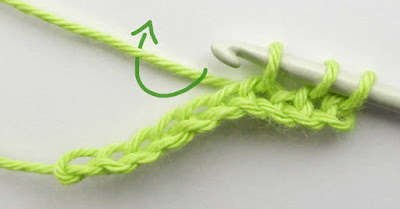
- Insert your hook as usual in the top of the previous row of stitches. YO and pull up a loop.
- Finish as usual. *YO, pull through two loops* until there is only one loop left on the hook.
- Repeat 5)-7) all the way and the result will be as shown below.
Video
(Added dec. 13th.) I've been asked if it was possible to show this on video. Here it is. The steps above are shown here.Turning
If you are doing rows, back and forward, then turn with 2 chains. Pull up a loop in the 2nd chain from the hook (green #1) and then - as usual when doing dc - insert the hook in the closest hole in the previous row and pull up a loop from this too (blue #2). *YO and pull through two loops* Repeat **. The first two stitches of the new row is done.Taller Stitches
As mentioned above, this techniques also works with much taller stitches. Try it with treble crochet stitches, and maybe even double treble or triple treble stitches, where you would usually yarn over 4 times before inserting the hook in the next stitch.
Three rows of linked double crochet stitches (LDC), done back and forward.
Fun Fact
The REALLY tall stitches can be named like this:- 3 yo: Double Treble [Dtr]
- 4 yo: Triple Treble [Trtr]
- 5 yo: Quadruple Treble [QuadTr]
- 6 yo: Quintuple Treble [QuinTr]
- 7 yo: Sextuple Treble [SextTr]
- 8 yo: Septuple Treble [SeptTr]
- 9 yo: Octuple Treble [OctTr]
- 10 yo: Nonuple Treble [NonTr]
An Alternative Linked Stitch
If you do not want the horisontal bar to be all that visible, I've worked out another solution, that is similar, but gives you a very different stitch.I have made a tutorial for what I call Back-linked Stitches. Click the link to read it.


0 comments
I love to hear your thoughts :)
I do my best to answer questions, but every once in a while a notification doesn’t reach me, so if you are in a hurry, try the contact page or write to me from Facebook or Instagram <3