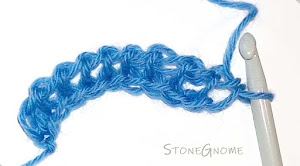
Tutorial: Tunisian Top Stitch
Learn to crochet the Tunisian top stitch - aka bump stitch. It is a VERY easy stitch and the stitch is also very fast to work with.
You crochet beautiful scarfs and more with this stitch.
If you are new to Tunisian crochet, this is a great stitch to learn, as it is very different from other Tunisian crochet stitches.
Updated and split into two posts in September 2021. Originally from September 2016.
Tunisian Top Stitch
Choose a yarn and a hook that is at least two sizes bigger than the yarn label suggests. Make a foundation row of just about 10 chains - or cast on if you prefer that. Now you are ready for the first row of Tunisian Crochet Top Stitches.
Related posts:
- Tunisian Crochet Foundation Row
- Tunisian Crochet Cast On (2 hooks)
- Tunisian Single Hook Cast On (1 hook)
- Tunisian Crochet Foundation Row
- Tunisian Crochet Cast On (2 hooks)
- Tunisian Single Hook Cast On (1 hook)
Forward Pass
You need to locate and hook into the 'bump' from the return passes. It's on top - and maybe a little behind - the vertical strings, we often use in Tunisian crochet. It is very similar to the back bumps of a chain row you use for a traditional foundation row.
Tilt your work a little if it helps to find the right bump.
If your last stitch of the first row got tight, it might be impossible to see or enter the first bump. So, be careful about that.
Tilt your work a little if it helps to find the right bump.
If your last stitch of the first row got tight, it might be impossible to see or enter the first bump. So, be careful about that.
Return Pass
You are now done with the second row :) Make a couple more rows just for practice.
Finishing Off
You end it like you do on regular crochet. Cut the yarn end and pull it through the last loop on the hook - at the right side of your work.Tips
Tip 1. Leave extra long ends when you start and when you finish. Weaving the ends in and out takes more yarn than other stitches.Make a Scarf
Imagine a scarf made purely with the Tunisian Top Stitch. Great drape, right?!If you want a little extra, then try the 3 Skein Scarf with the neat color change.
Have fun with it :)


0 comments
I love to hear your thoughts :)
I do my best to answer questions, but every once in a while a notification doesn’t reach me, so if you are in a hurry, try the contact page or write to me from Facebook or Instagram <3