Slip Stitch Tutorials - Part III
There are more ways to do slip stitch increases and decreases. I have found a few on the internet, but had to invent some of my own too, to cover my needs.
I'm sharing my preferred methods for each of the basic slip stitch types with you. They are almost invisible on both sides of the work.
Did you read my initial slip stitch tutorials and the slip stitch article: The Forgotten Crochet Stitch? If not, remember to visit those pages as well.
See how to do the slip stitch increase in the video.
See how to do the BLO and FLO increases in the video.
If you prefer a video, you'll find it here:
I'm sharing my preferred methods for each of the basic slip stitch types with you. They are almost invisible on both sides of the work.
Did you read my initial slip stitch tutorials and the slip stitch article: The Forgotten Crochet Stitch? If not, remember to visit those pages as well.
Abbreviations
For clarification reasons. Btw, there are other ways to abbreviate slip stitches.- SS = Slip Stitch (or sl st)
- iSS = Slip Stitch Increase
- dSS = Slip Stich Decrease
- BLO = Back Loop Only
- FLO = Front Loop Only
Increases
Slip Stitch Increase
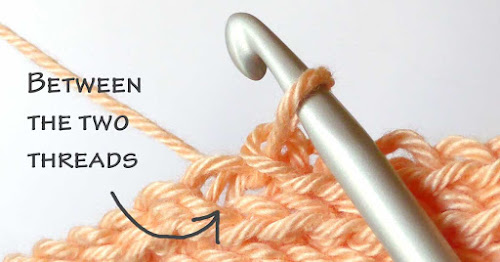
Between the two holes, where you usually insert your hook, there are two threads. Insert your hook in between those, when you increase. In the image here, I have separated them a little, to make them more visible.See how to do the slip stitch increase in the video.
Slip Stitch BLO Increase
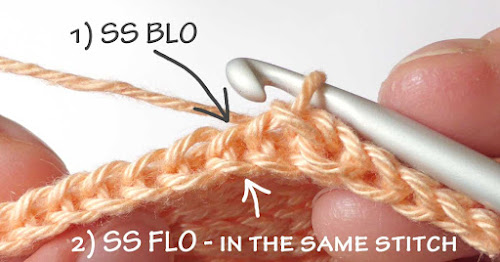
Slip stitches in back loop only is also called Bosnian Crochet. This is the more common of the slip stitches. You can increase like this:- hook into the back loop of the stitch (as usual). Yo (yarn over) and pull through all loops.
- hook into the FRONT loop of that same stitch. Yo and pull through all loops.
Slip Stitch FLO Increase
When doing front loop only slip stitches, you also increase by making two stitches in the same stitch. But in the opposite order:- hook into the front loop of the stitch (as usual). Yo and pull through all loops.
- hook into the BACK loop of that same stitch. Yo and pull through all loops.
Decreases
Slip Stitch Decrease
This is a little tricky. Take it slow the first times. You will hook into 2 stitches right after each other, but in the opposite direction of what you are used to. And don't do yarn over or likewise until told so.- hook into the front loop of the second stitch from your hook
- hook into the stitch right before that (both loops) = the stitch that was next to your hook, before you started the decrease.
- Yo (yarn over) and pull through all loops.
See the video for a slip stitch decrease here:
Slip Stitch BLO Decrease
This is easy. Hook into two stitches before you do yarn over:- hook into the back loop of the stitch right next to your hook
- hook into the back loop of the next stitch too
- Yo and pull through all loops
Slip Stitch FLO Decrease
Similar as the BLO decrease, BUT hook into the second stitch from your hook first.- hook into the front loop of the second stitch from your hook
- hook into the front loop of the stitch you just skipped
- Yo and pull through all loops
Want More?
This was the final slip stitch tutorial for now. There is a lot more to slip stitches though, like playing with colors for instance:- Bosnian Crochet Fabric - try clicking the images
- Bosnian crochet in color
- Slip stitch crochet - in the round - and with two colors
- How to make mittens, a scarf and beanie. FREE PATTERNS! The free patterns and most text are in BOTH Finnish and English. Look at the bottom of each post for the English version.


0 comments
I love to hear your thoughts :)
I do my best to answer questions, but every once in a while a notification doesn’t reach me, so if you are in a hurry, try the contact page or write to me from Facebook or Instagram <3