Free Pattern: Slip Stitch Ribbed Boot Cuffs
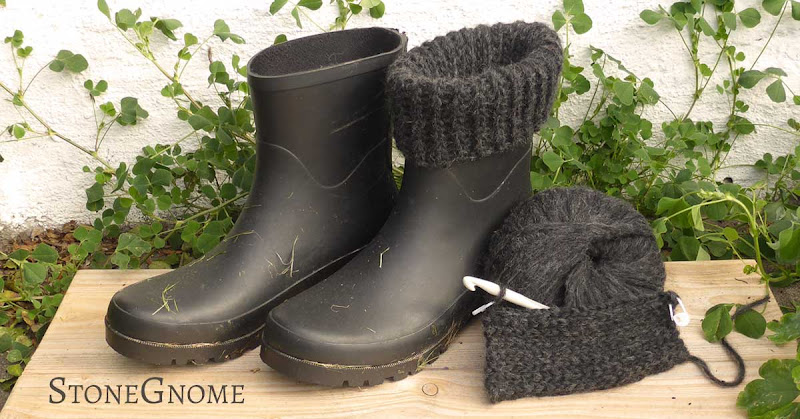
Need boot cuffs - or just want to practice slip stitches? Use the boot cuffs as decoration, to stay warm or to give the boots a nice soft top.
I bought a new pair of rubber boots. But the upper edges feel a bit rough at my legs, so I figured, I could soften them with boot cuffs.
Working size: 21cm long, almost 15cm wide. (Or 8in long and almost 6in wide)
Size when stretched on a boot: 13cm wide, 36cm long (5in wide, 14in long)
Boot top circumference: 36cm (14in)
Weight/yardage: around 15 gram ~ 45meter (0.5oz ~150feet) of Drops Air (one cuff)
Notes: Do slips stitches into the back loop of the stitches only (also called Bosnian crochet). Read more about slip stitch ribbing here.
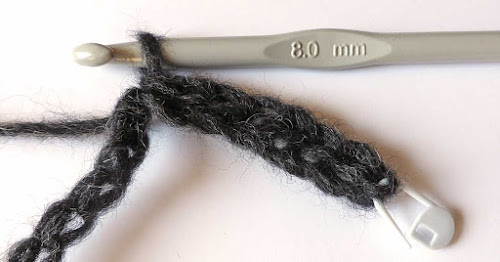
Whenever you reach the end of a row, insert your stitch marker around the loop on your hook (img).
Later you will stitch into the back loop of that same stitch (the one with the stitch marker). De-attach the stitch marker and re-attach the stitch marker around the new loop you have on your hook.
Fold the cuff as a bracelet with your current row slightly covering the first row of the cuff. Slip stitch the two ends together: Insert the hook into both layers. Yarn over and pull through all loops. Repeat this all the way. This gives you a nice slip stitch structure on the side facing you. Make this side the visible one.
Cut yarn and pull through the last loop. Sew in ends. Place your sewing in the same direction as the ribbing and not across. If you go across the ribbing, you will loose some of the required stretchiness.
I bought a new pair of rubber boots. But the upper edges feel a bit rough at my legs, so I figured, I could soften them with boot cuffs.
Measurements
Below is what one of my final boot cuffs measure. You should adjust the length of your boot cuffs, so they are a bit tight on the boots, however not fully stretched. If they don't get tight enough, they might not stay put.Working size: 21cm long, almost 15cm wide. (Or 8in long and almost 6in wide)
Size when stretched on a boot: 13cm wide, 36cm long (5in wide, 14in long)
Boot top circumference: 36cm (14in)
Weight/yardage: around 15 gram ~ 45meter (0.5oz ~150feet) of Drops Air (one cuff)
Slip Stitch Pattern
- Hook: 8mm
- Yarn: I used Drops Air. (150m/50g or 164y/1.76oz)
Any yarn you can do slip stiches with will work. - 2 stitch markers
- Needle and scissors
Notes: Do slips stitches into the back loop of the stitches only (also called Bosnian crochet). Read more about slip stitch ribbing here.
Whenever you reach the end of a row, insert your stitch marker around the loop on your hook (img).
How to insert your stitch marker. See more at the slip stitch ribbing article.
Later you will stitch into the back loop of that same stitch (the one with the stitch marker). De-attach the stitch marker and re-attach the stitch marker around the new loop you have on your hook.
Rows
- Use the no-knot method described here and chain 22.
Attach the stitch marker. Turn. Don't do a turning chain.
- Slip stitch into the back loop of the stitch closest to your hook. Make this first stitch after your first turn a little tight, to avoid a loose stitch at the corner of your work. Slip stitch into the back loop of each stitch all the way.Attach the stitch marker. Turn. (No turning chain).
-
Slip stitch into the back loop of the stitch closest to your hook.
Slip stitch into the back loop of each stitch all the way.
Re-attach the stitch marker. Turn. (No turning chain).
Fold the cuff as a bracelet with your current row slightly covering the first row of the cuff. Slip stitch the two ends together: Insert the hook into both layers. Yarn over and pull through all loops. Repeat this all the way. This gives you a nice slip stitch structure on the side facing you. Make this side the visible one.
Cut yarn and pull through the last loop. Sew in ends. Place your sewing in the same direction as the ribbing and not across. If you go across the ribbing, you will loose some of the required stretchiness.
Fold the cuffs in half over the top of the boots. Enjoy your new boots!
About the Yarn
The Drops Air yarn I used is very, very soft. Maybe a little too soft for a project like this - though I love the feeling at my legs. I got it as a present and just wanted to spoil myself here.
You can easily use a less soft yarn, like cotton or likewise. A more sturdy/firm yarn might even be easier to clean and is probably better at staying at the top of the boots, when you take your boots off.
You can easily use a less soft yarn, like cotton or likewise. A more sturdy/firm yarn might even be easier to clean and is probably better at staying at the top of the boots, when you take your boots off.


0 comments
I love to hear your thoughts :)
I do my best to answer questions, but every once in a while a notification doesn’t reach me, so if you are in a hurry, try the contact page or write to me from Facebook or Instagram <3