StoneGnome

Crochet Love · Crochet & Tunisian Crochet · Studying, Developing, and Teaching Crochet Techniques

  • Home/Blog
  • Crochet
    • Basic Skills
    • Beyond the Basics
    • Advanced Crochet
    • Stitches and Stitch Patterns
  • Tunisian Crochet
    • Basic Tunisian Skills
    • Beyond the Basics
    • Advanced Tunisian Skills
    • Stitches and Stitch Patterns
  • Tutorials n Guides
    • Guides
    • Step by Step Tutorials
    • Stitches and Stitch Patterns
  • Patterns
    • Free Patterns
    • Paid Patterns
  • Themes
    • Slip Stitches (ss)
    • Felting
    • Hats
    • Ribbing
    • Split Crochet Love
    • Top Stitch
    • Amigurumi
    • Small Hearts
    • Ornaments
    • Seasonal Themes n more
  • About
    • Contact Me
    • Copyright and Selling
    • Personal Data, Cookies and Marketing
Tunisian Crochet is fun and can be very meditative. Here is how you make a traditional foundation row to get started.
Tunisian Crochet Founcation Row

If you are a newbie to Tunisian Crochet, try it!

Updated September 2021. Originally posted as part of the Tutorial: Tunisian Top Stitch from 2016.

Tunisian Crochet in General

Is this your first try on Tunisian Crochet? If so, you should know it is all about a forward motion/ forward pass and a back motion/return pass. On the forward pass, you pick up loops. On the return pass, you finalize each of the crochet stitches.

You also insert the hook a little different from regular crochet in most cases - as you have other options here - which makes the stitches look a bit different too.

However, the way you work each of the stitches is still crocheting.

The outcome of a Tunisian Crochet piece can be a lot more like knitting, which is great for the drape and thereby for making wearables, scarfs, and other soft crochet pieces.

Tunisian Foundation Row

Choose a yarn and a hook that is at least two sizes bigger than the yarn label suggests. Most hooks will easily have space for 10 stitches on the neck. Else, just make fewer chains in this tutorial.

1) Chain row
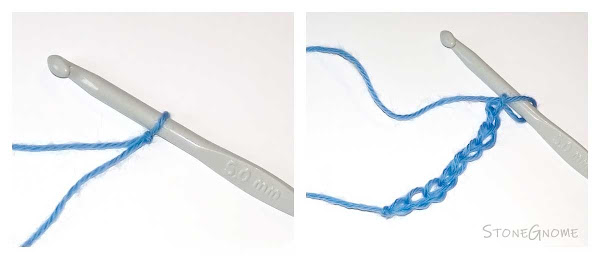
Make a slip stitch and insert the hook. Crochet 9 chains for a foundation. This will give you 10 stitches, as the loop on your hook is number 10.
Tunisian Crochet Chain Row

Now turn your work sideways, so you can see all the bumps that might usually be on the back of your work. These are the loops you will insert the hook into.
Tunisian Crochet - hook into the back bumps

2) Forward Pass - pick up loops
Insert your hook into the first bump, right next to the hook. (Some skip the first bump and it CAN be difficult to hook into. So if it suits you better, do that.)

Yarn over (yo) and pull through one loop. You now have 2 loops on the hook. They stay there during the forward motion.

Tunisian Crochet - make the first stitch


*Insert the hook into the next bump, yo, and pull through one loop only.* Repeat this till you have used all bumps. When you have reached the end, you have 10 loops on your hook.
Tunisian Crochet - forward pass

3) Return Pass - complete each stitch
Chain one. (Yo and pull through one loop only). This is the left edge of your work.
Tunisian Crochet - left edge

*Yo and pull through two loops.* Repeat until you only have one loop left on the hook.
Tunisian Crochet - return pass

AVOID the temptation to pull tight, when there is only one loop left on the hook. You can tighten your work so much, that it is difficult to proceed from here with a nice result.

Tunisian Crochet - Foundation Row

Tadaa!! Now you are ready for your next row :)

From here most people learn the Tunisian Simple Stitch (tss), the most commonly known stitch in the Tunisian Crochet world.

You could also try something nice and a bit different like the lovely Tunisian Top Stitch. It's one of my favorite stitches and it doesn't get enough attention in the crochet world.

You will find a tutorial right here: Tutorial: Tunisian Top Stitch

Did You Know?

Instead of starting with a chain row, it is also possible to do a cast-on. You can either do the Tunisian Single Hook cast on or the Tunisian Crochet Cast On. The last one requires two hooks but is really beautiful and very popular on this site.

Tunisian Crochet Cast On - Single Hook
Tunisian Crochet Cast On - Two Hooks

Choose whatever works best for you with a specific Tunisian Crochet Project.
Share
Tweet
Pin
No comments
Learn to crochet the Tunisian top stitch - aka bump stitch. It is a VERY easy stitch and the stitch is also very fast to work with. You crochet beautiful scarfs and more with this stitch.
Tunisian Crochet Top Stitch Tutorial

If you are new to Tunisian crochet, this is a great stitch to learn, as it is very different from other Tunisian crochet stitches.

Updated and split into two posts in September 2021. Originally from September 2016.
     

Tunisian Top Stitch

Choose a yarn and a hook that is at least two sizes bigger than the yarn label suggests. Make a foundation row of just about 10 chains - or cast on if you prefer that. Now you are ready for the first row of Tunisian Crochet Top Stitches.

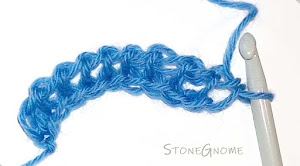
Tunisian Crochet first row
Related posts:
- Tunisian Crochet Foundation Row
- Tunisian Crochet Cast On (2 hooks)
- Tunisian Single Hook Cast On (1 hook)

Forward Pass

You need to locate and hook into the 'bump' from the return passes. It's on top - and maybe a little behind - the vertical strings, we often use in Tunisian crochet. It is very similar to the back bumps of a chain row you use for a traditional foundation row.

Tilt your work a little if it helps to find the right bump.

If your last stitch of the first row got tight, it might be impossible to see or enter the first bump. So, be careful about that.

1. Insert the hook into the first bump, right next to the hook. Yarn-over (yo) and pull through one loop. You now have 2 loops on the hook. (img below)
Top stitch - insert the hook
2. *Insert the hook into a bump, yo, and pull through one loop only.*
Repeat ** till you have all 10 loops on the hook.

Return Pass

3. Left edge: Chain one (pull through one loop only).

4. *Yo and pull through two loops.*
Repeat ** till you have only 1 loop left on the hook.

You are now done with the second row :) Make a couple more rows just for practice.

Finishing Off

You end it like you do on regular crochet. Cut the yarn end and pull it through the last loop on the hook - at the right side of your work.

Tips

Tip 1. Leave extra long ends when you start and when you finish. Weaving the ends in and out takes more yarn than other stitches.

Tip 2. When you are doing a back motion, then stretch the work a little with your left hand. This gives your work a more uniform look.

Tip 3. In a return pass: When you need to pull yarn from the yarn ball, then hold on to the first loop with your index finger, so you don't accidentally pull the previous bump too tight.

Make a Scarf

Imagine a scarf made purely with the Tunisian Top Stitch. Great drape, right?!
If you want a little extra, then try the 3 Skein Scarf with the neat color change.

Have fun with it :)
Share
Tweet
Pin
No comments
Have you noticed Double Crochet Stitches (dc) tend to get skewed/slanted? Sometimes it's very visible and if you want to straighten them out, the solution is simple and easy to remember. It can be used for taller stitches too.

Avoid Skewed Double Crochet Stitches

For me this mostly applies to open crochet projects, However, it does happen that I also use this technique in something like a granny square with lots of DCs next to each other. It just adds a little extra to the overall look.

When your double crochet (dc) stitches don't line up as beautiful as you want, the reason can be, that you have a very open pattern and/or very loose stitches. The loose work makes room for the foot of the stitches to move a little in the horizontal direction. Chevron patterns can make the imperfection even more visible.

Another Double Crochet Tip: Start a Row with a Fake Stitch

The Workaround

You avoid the messy look by inserting your hook differently. If you look closely at the top of a dc stitch, you can see the hole you would normally use. At the bottom right of the regular hole is a small loop. If you stitch through this loop, it will help the foot of your dc stay put on top of the previous dc.

Crochet nicer double crochet stitches

The slope only exists at the top of higher stitches, so don't look for it, when you are about to hook into a chain stitch.

Related article: Linked Stitches

Stitch Height

Your workaround stitches will be slightly shorter, than a regular dc. So don't change the way of stitching in the middle of a project. If you are about to start on a new project, then make sure to do your gauge swatch with the exact stitch you want to use.

Workaround for avoiding Skewed DC Stitches

When (Not) to Use the Workaround

As said already, this little double crochet trick is mostly needed, when you work on something loose, open, and/or chevron. If you work on a project with a lot of dc stitches close to each other - or a tighter piece - chances are, the stitches fill in all holes beautifully. 

Only in a few tighter cases - like an outside-in granny square I recently played around with - it makes sense. Here, the hole pattern relies a lot on stitches being placed upon each other. Hence I used the dc workaround and got really nice stitches.

Crochet Granny Square - Outside-in

Btw. the granny square idea shown here, was presented to me by Tuula Maaria @instagram. See her youtube video, if you want to try one too :)


Note. The original post was made in July 2017. The latest update is from May 2021.

Share
Tweet
Pin
3 comments
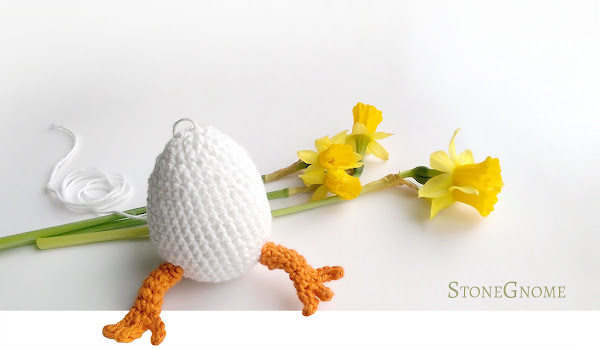
If you haven't met the cute Junior Egg already, let me introduce you now. He/she likes to sit in a nest of yarn - or hang from a twig or a tree. And the Junior Egg pattern is free!
Crochet Easter Egg - Junior
Years ago, right before Easter, the kids and I played with paper and cardboard and we came up with an egg with legs because it was pretty easy to draw and cut out and glue.

We loved it! We thought the result was eggcellent. An egg with a lot of personality. So I thought. Why not make a crochet version? 
Materials

  • Hook size 2-2.5mm (US 0-B1, UK 14-13)
  • Scissors
  • A long piece of scrap yarn to use a stitch marker
  • Filling
Yarn
Cotton yarn with yardage around 170m/50gr (186y/1.76oz)
A tiny bit of white and orange.

Spiral Note
The egg and leg are worked in a spiral. Working in a spiral means working in continuous rounds without ending each round with a slip stitch. Put your scrap yarn stitch marker in place, when a round is done, and continue with the next round immediately. The yarn stitch marker show what round you are working on.

Abbreviations (US terms)
  • ch = chain
  • sc = single crochet
  • inc = increase. Make two sc in the same stitch.
  • dec = decrease. Work 2 sc together. 

  • () = repeat instructions between parentheses as many times as directed – OR throughout the round/row.
  • [] = the number of stitches in a round or row.

Junior Egg Pattern

Work in a spiral.
  1. Begin with 5sc in a magic ring. Pull tight. [5]
Increase with 5 stitches in each round like this:
  1. 1 inc in each stitch all the way. [10]
  2. (inc, 1 sc) 5 times. [15]
  3. (sc, inc, sc) 5 times. [20]
  4. (inc, 3 sc) 5 times. [25]
  5. (2 sc, inc, 2 sc) 5 times. [30]
  6. (inc, 5 sc) 5 times. [35]
Round 8-15. (8 rounds in total). Work straight up now – no increases. 1 sc in each stitch. [35]

For shaping the top of the egg, I recommend invisible decreases*: Insert the hook into the front loops of the next 2 stitches right after each other (do not yarn-over in between). Yarn-over and pull through two loops. Yarn-over and pull through the last loop.
*Don't make invisible decreases if you plan to turn the backside out like I sometimes to do.

  1. 1 sc, (dec, 15 sc) 2 times. [33]
  2. (9 sc, dec) 3 times. [30]
  3. (4 sc, dec, 4 sc) 3 times. [27]
  4. (7 sc, dec) 3 times. [24]
  5. (3 sc, dec, 3 sc) 3 times. [21]
Add fill. Add more fill after the next couple of rounds.
  1. (5 sc, dec) 3 times. [18]
  2. (2 sc, dec, 2 sc) 3 times. [15]
  3. (1 sc, dec) 5 times. [10]
Remove your marker. The closing off is not worked in full rounds.

Closing Off the Egg
Cut a long yarn end. Expand the loop on the hook and pull until the yarn end is out and the work secured.

Attach a needle to the yarn end. Insert the needle into the front loop of every stitch all the way around (9 stitches). Pull tight and the hole closes.

Only if needed, secure the yarn again, by weaving it in and out a couple of times.
Use the yarn end for hanging the egg on a twig.

Related blog post: The Easter Bunny Egg pattern


Bunny Egg and Junior Egg
Bunny Egg & Junior Egg

Leg

Work in a spiral.

Foundation option #1: Ch 5. Slip stitch it into a ring. [5]
Foundation option #2: Magic Ring with 5 sc. [5]

1-6) Sc all the way for 6 rounds.
 
7) Toe: Ch 4.
 
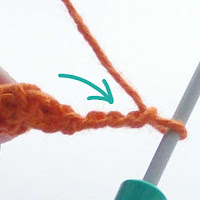
8) Use the back bumps of the chains. Skip the first and slip stitch into the next three.
9) Slip stitch into the middle of the foot through front and backside.
10) - 11) Repeat line 7-8.
12) Slip stitch into the left side of the foot.
13) - 14) Repeat line 7-8.
15) Slip stitch into the side of the foot again.

Finishing Off
Cut a long yarn end and pull the yarn end through the slip stitch.

Pull the yarn through the leg, so both yarn ends are at the top of the leg. (Find the nearest ’hole’ to pull it through. Use a needle or your hook).

Make another leg.

Sew the legs on the egg. Place them somewhat on the same side. ’Fold’ the legs, with the toes pointing forward and the ’knees’ slightly bend.

Free crochet pattern - Junior Egg

Thank you to Sofiia Norah Rasmussen for helping me test this with short, short notice.

If you want ideas of how to make a colored version, then check what Margie did on Instagram and give her a little love.

Enjoy!


Note. The original blog post is from March 2017. The latest update is of March 2021.

Share and Selling Note
You are welcome to share or sell any products you make from my patterns. :)
Read more about copyright and selling here.
Share
Tweet
Pin
2 comments
Suddenly there were Bernie Sanders' mittens all over. What a joy and GREAT inspiration :) Like many other yarn geeks, I've tried to see if I could figure out the color pattern of the mittens.
I'm not sure, though I will make the actual mittens. However, I do have quite a detailed idea of HOW I would do it and maybe this could be of interest to you?

I would crochet in the round in waistcoat stitches (ws), so the mittens got the knitted feeling and would be as warm and cozy as they look at the photos of Bernie Sanders.

The Color Pattern

I had great fun making the color pattern. I used a drawing app on my iPad, that can do grids and layers, but I can also recommend StitchFiddle if you want to make your own stitch pattern and be sure your gauge works well.

Related blog post: From Image to Crochet Chart

Here is my green version of the color pattern. Choose whatever color you like.
Bernie Sanders mittens in green

Sketching Bernie Sanders Mittens

This is ONLY A SKETCH, but if you are interested in trying, you are welcome to use it. I will also gladly help you if you stumble upon something here, that you need help with.

Hook. Use a 5mm hook
Yarn. Stretchy wool yarn blend with yardage around 200m/50gr. Fingering (or possible Sport).

- - -
Foundation. Chain 30-42 to start with. A number divisible by 3. (Might need a swatch to test the gauge). Turn the chain row into a circle with a slip stitch. Work in a spiral.

Cuff ribbing. Crochet *2 ws, 1 ch* for several rows.

From cuff to hand. Waistcoat stitches only. Increase evenly in the first round (maybe two rounds). You will need a number of stitches divisible by 4 - plus 3 extra stitches (like 32+3=35).

Because. The color pattern is made of repeats of 4 stitches and the root of the thumb could require 3 stitches.

Make a couple of extra rounds. 2-4 rounds I think.

The Thumb
Below is how I would try to make the thumb. I would begin the colorwork right after starting the thumb part. So read both parts now.

Place two stitch markers with 3 stitches between them. The stitch markers mark the beginning and end of the hand. In between them is the thumb.

The middle stitch will be worked normally all the time. Increase when working into the other two stitches next to the stitch markers.

Increase at every second round or what works for you. Move the stitch markers up accordingly. Always increase in a stitch right next to the stitch marker and on the thumb-side of that stitch marker.

Once the base of the thumb is done, simply skip the thumb stitches and continue with the hand part (= skipping all the thumb stitches between the stitch markers).

Do the thumb-increase for something like 5cm (2inches).

Color Work
After initiating the thumb, I would start working on the color pattern as well. The stitch markers marking the thumb are placed in the first and last stitch of the hand. These are also the last and first stitches of the colorwork. So just pretend the thumb isn't there when you look at the color diagram.

Use a solid color for the thumb - or carry through the color from the color pattern.

Color Change Tips
Prepare a color change by changing yarn when you do the last YO-pull-through of a stitch. (Right before the visual color change).

Carry the un-used yarn color on the wrong side of the work or hide it by crocheting over it.

Finalizing the Hand

Carry on with the colorwork until you have about an inch left of the desired length of the mitten. Decrease on both sides at every round now.

Hopefully, you are now working with the dark color and don't have to figure out the colorwork at the same time.

Finalizing the Thumb
Crochet the rest of the thumb in any color. Work straight up till it is long enough and then decrease all the way around.

Would You like to Try?

Would you like to try? I'll be here to help you if you run into trouble. And who knows. Hubby asked for fingerless gloves long ago. One day, I might make him a pair using the color pattern above.

Have fun :)
Share
Tweet
Pin
No comments
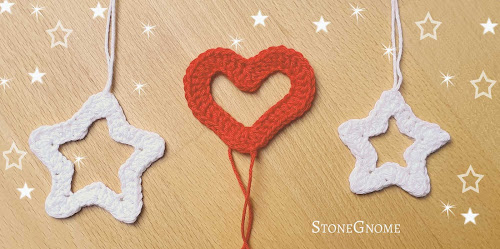
Let us end the year by being kind to ourselves and each other. I have a FREE little heart-shaped crochet love for you. 
Crochet a little heart with a crocheted string
Hang it on the Christmas tree, as decor for a present or just make one if you need a break during the holidays. 

Share
Tweet
Pin
No comments
To all the little stars in the world. Crochet a little star or two. 
Crocheted Stars

In a few weeks, it is December 1st. I'm not good at being ahead of the season, but this year my sweet kids started making little ornaments a while ago, so I joined them. 

Making the star pattern was a bit frustrating at first. :) Sometimes making things very simple is difficult. I also wanted it to somehow match the Valentine's heart, which can be used as a Christmas decoration as well.
Read more: See more hearts at Stonegnome

I think they will look good together in a window or at the Christmas tree.

Crocheted star and heart

Below is the crocheted star pattern. Have fun ❤️

Star Pattern

While working on the pattern it can be difficult to see the star shape. The further you get, the better it should be, and once blocked and shaped, it should be just how you want it.

Little star: around 5cm wide (2")
Medium star: around 6cm wide (2.4").

  • hook size 2.25-2.5mm (US: B/1, UK 13)
  • cotton yarn. Yardage around 170m/50g (185y/1.76oz)
  • optional. A stitch marker.
  • glasses, if needed.
Abbreviations (US terms)
ss = slip stitch
ch = chain
hdc = half double crochet
dc = double crochet
tr = treble crochet
yo = yarn over
[ ] = instructions for the medium star

Foundation
Chain 30 [medium star, chain 40]. Join with a ss to make a ring.
Optional. Turn the work, so you can see the back bumps of your chains. Hook into the back bumps.

1) chain 3
2) 1 dc and 1 hdc in the base of the 3 chains
3) 1 hdc in the next chain [medium star, repeat the line]

Now make a cluster-decrease of two hdc with a skipped chain between. like this:

4) yo, insert the hook into the next chain and pull up a loop
5) skip a chain
6) yo, insert the hook into the next chain and pull up a loop
7) yo and pull through all 5 loops on the hook

Continue with:

8) 1 hdc in the next chain [medium star, repeat the line]

Star point
Tip: when working a lot of stitches into a single chain, the chain right AFTER might get very tight. Avoid it being tight by inserting a stitch marker into it before you start the previous group of stitches.

9) (optional. Place a stitch marker in the second chain from the hook)
    Make 5 stitches in the next chain (= the first chain from the hook): 1 hdc, 1 dc, 1 tr, 1dc, 1hdc

Continue with:

10) (optional. Remove the stitch marker)
      1 hdc in the next chain [medium star, repeat the line]

Repeat from line 4 until you reach the last star point, which is already halfway done.
(The initial 3 chains you made in the beginning, are substituting the tr.)

11) In the base of the 3 chains make two more stitches: 1hdc, 1dc

Join with a ss, cut the yarn, and secure it by pulling it through the last loop on the hook. Sew in the yarn end from your foundation chain. Make it come out at the top of the star. Use the two yarn ends for hanging up the ornament.

Wash and block* it for a perfect shape and you've got a star!

Let me know if you find any typos in the pattern. ❤️


*Wash and block
I highly recommend blocking for the best final touch.

Handwash the star. Press out excess water by wrapping it in a towel. Place the star on a flat surface and pull the outer and inner star points till you are happy with the shape. Use water-safe needles and a foamboard or likewise if you prefer - I just do it freehand.

The star points can be pointed or more rounded. Let the star dry.

Make a Whole Family of Stars

You might have figured out by now how to make an even bigger star. Every time you add 10 more chains to the foundation row you go up one size. And the line with 1 hdc is also repeated once more (lines 3, 8, 10).

I tried and ended up with 4 different sizes of stars. After blocking and a little nursing, even the bigger one got very good.

Crocheted star family

I'm not sure how far you can go and keep the shape, but feel free to try :) Just be aware that the larger the star, the more wobbly it will be and you might need to use stiffener if it is to be hung up.

Tag me on Instagram @stonegnomedesign to show me your star(s).


Enjoy!


Sell & Share
You are welcome to sell/share any products you make from my patterns. For further information look at Copyright and Selling

Snowflakes

If you like crocheted Christmas ornaments, try the two snowflakes too - Snowflake 1 and Snowflake 2
Crocheted snowflakes
Share
Tweet
Pin
No comments
Evie's FREE ear warmer pattern is ready.
Crochet a Flexible Ear Warmer
It doesn't take much yarn to make. Find the pattern at Ravelry or LoveCrafts now.

Share
Tweet
Pin
No comments
The world changes and so does a few things here.

Crocheted ear warmer n gloves

Last Chance of free gloves

It's your last chance of getting Evie's gloves pattern for free. Find the gloves at Ravelry or LoveCrafts.
The reason is, an ear warmer is about to join Evie's Eternities accessory set. This will be the new freebie of the set.

Last Newsletter

If you have signed up for newsletters, this might also be the last newsletter you get like this. I'm migrating to another mailer-system. At least I hope, I will. If you don't see anything from me in near future, then check your spam folder. 📧
More minor changes might happen too. We'll see.

A Personal Update

I have been silent for a while, I know.
Share
Tweet
Pin
No comments
Newer Posts
Older Posts

Newsletter

Don't miss the next tip or pattern
from StoneGnome.

Find StoneGnome at

  • Ravelry
  • LoveCrafts
  • Littlebugz

  • Facebook
  • YouTube
  • Pinterest
  • Instagram

Popular Posts

  • Tunisian Crochet Cast On
  • Free Snowflake Pattern
  • Tunisian Single Hook Cast On
  • A Valentines Heart for You
  • Avoid an Ugly Slip Knot

Labels

advanced amigurumi basic beads Bornholm christmas crochet crochetChart easter edge felting filetcrochet freePattern guide hat miteredCorner ornament paidPattern pattern ribbing shoes slipStitch spiral Split Crochet stitchPattern topStitch tunisian tutorial

recent posts

My favorite Links

  • My designs at LoveCrafts
  • My designs at Ravelry
  • My design page at Littlebugz.dk
  • Annie's Catalog
  • Designing Vashti
  • Crochet Kim
  • Free Vintage Crochet
  • Stitch Fiddle
  • Stitchboard · Pattern Wizard
FOLLOW STONEGNOME @INSTAGRAM

    Powered by Juicer.io

Ⓒ StoneGnome · Created with · by BeautyTemplates